How to Backup Contacts and SMS in Android and Upload it to Google Drive.
Nowadays, mobile is a part of daily life but data is more important than mobile. You never know when your mobile will crash or get infected with a virus or fall out of your hands. After any accidental damage of your mobile you can buy a new mobile but if you lose your important data then recovering becomes a very difficult task.
There is a very famous quote– prevention is better than cure. Therefore, if we keep a backup of contacts and messages, it will be very beneficial in case of any unwanted situation. Let’s get started.
There are many ways and applications you can use to backup contacts and messages. But here is the easiest. Actually, for the past few years I have been using the Super Backup and Restore app to backup contacts and messages. You can download the application from here.
How to Backup Contacts
- To backup contacts, Open the app and give the app the necessary permissions to read and write your contacts and messages. Application can no longer be used without permission.
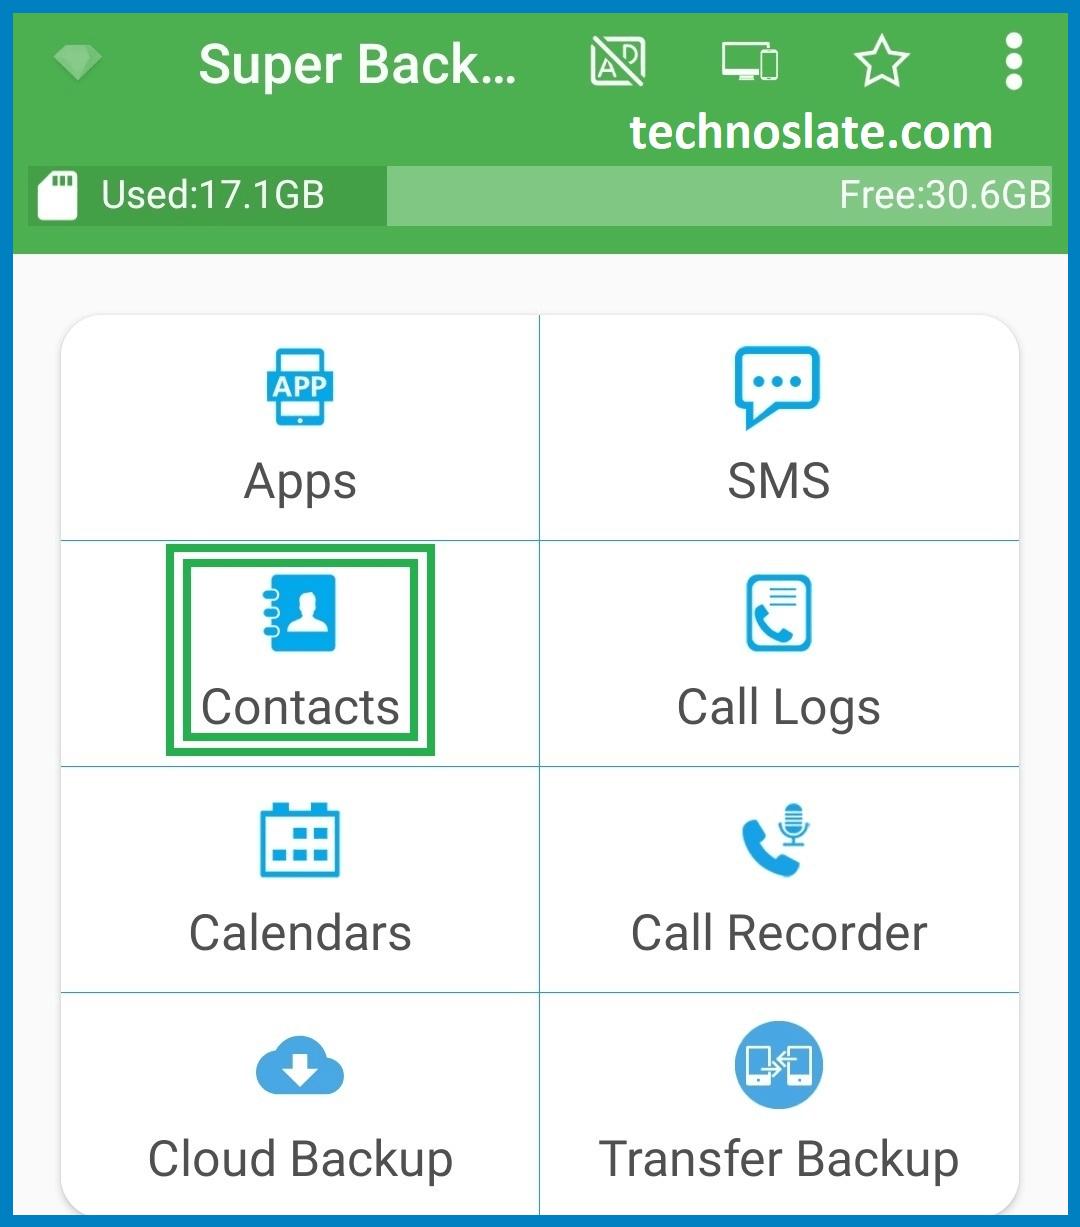
- Tap on Contacts and allow.
- Select the option Backup All
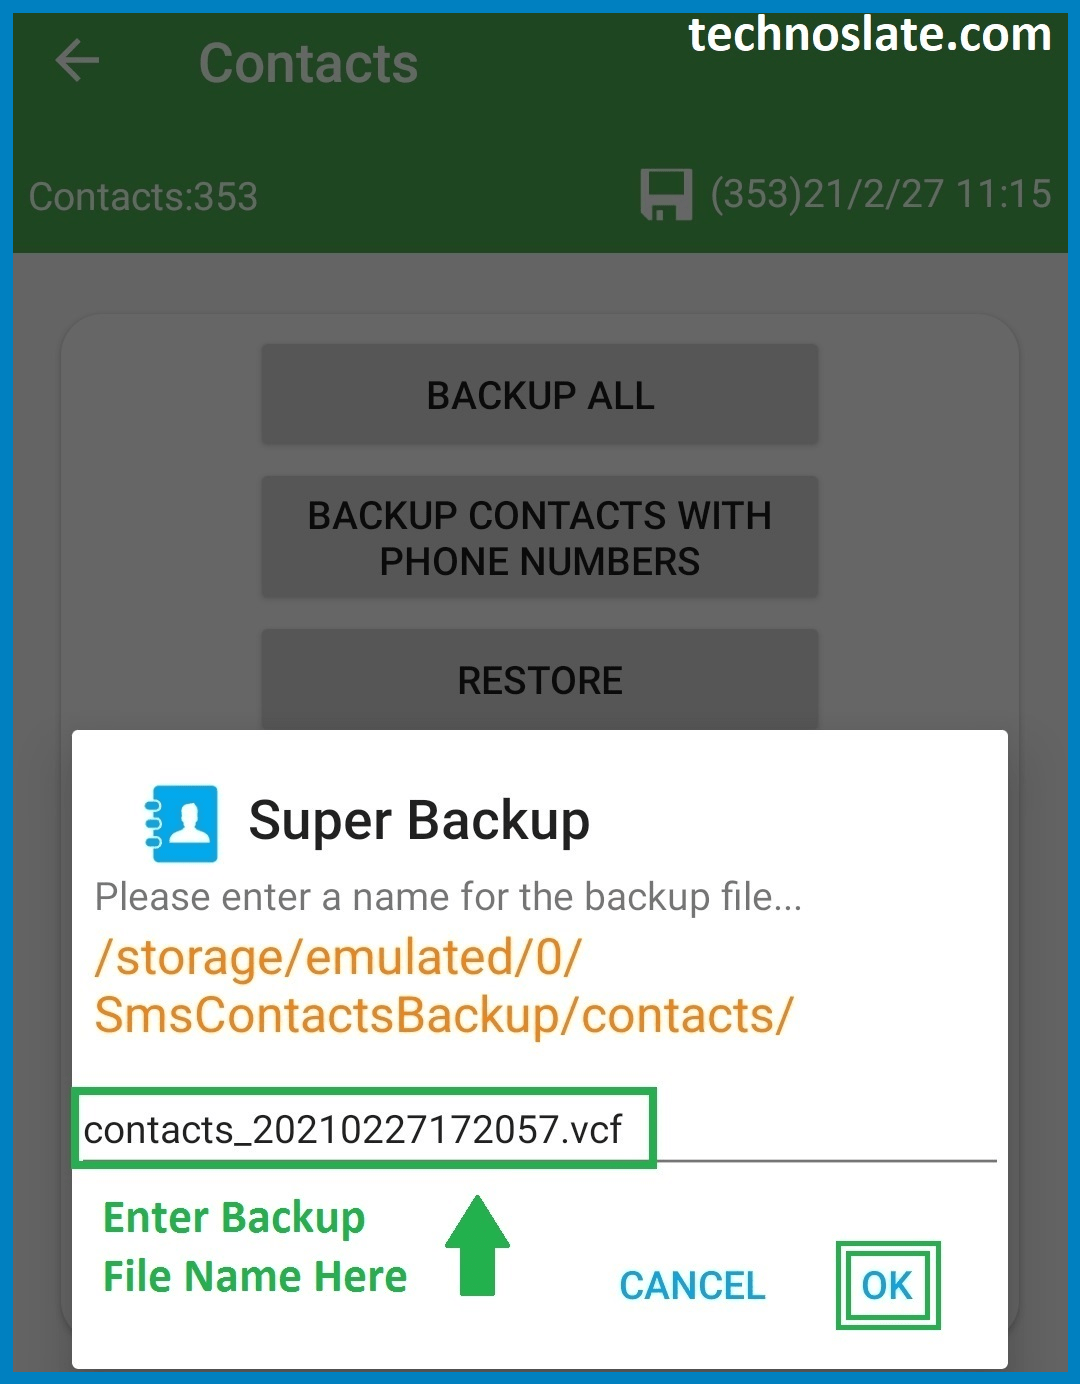
- A dialogue box will open. In that dialog box you can name the backup file of your choice otherwise the application will generate a name according to the time at which you will be taking the backup. Press OK and then wait for the backup process to complete. The application will show you a confirmation message after completing the process.

How to Backup SMS
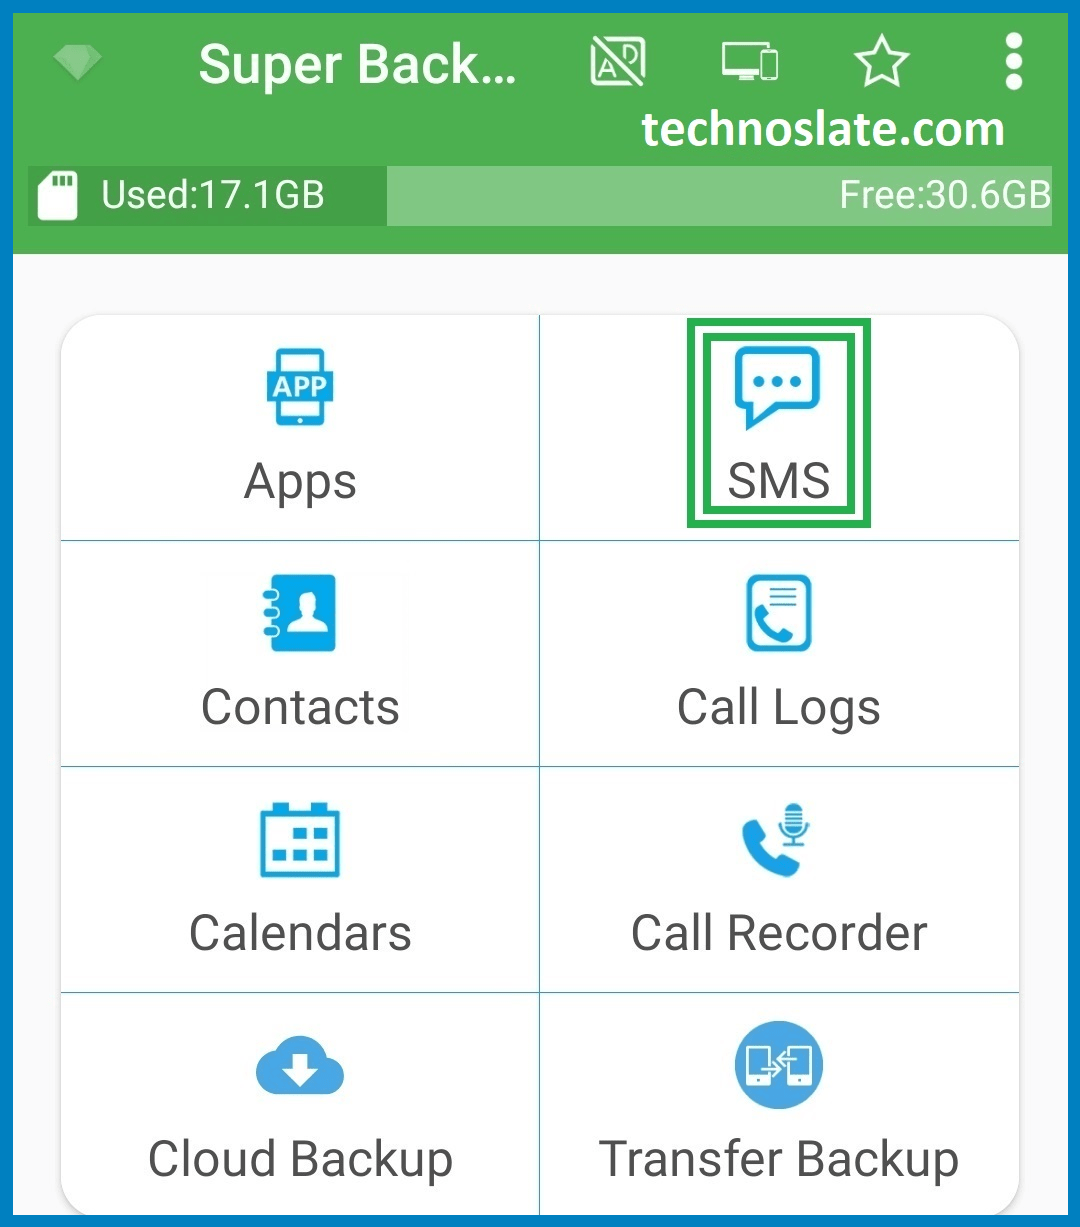
- Open the app and grant the required permission to the app if you haven’t already granted otherwise proceed.
- Select SMS
- Follow the previous steps until the backup process of your messages is complete.
Where Backup Contacts and Messages Files are Stored?
The backup you have taken is stored somewhere in your mobile. So whenever you want to restore your data in future, you can use it. Now, let’s see where your backed up contacts and messages are stored.
Note: If you want to download the simplest and easiest file manager then I would suggest using MI File Manager. And if you want to use a feature rich file manager then ES File Explorer is the best available file manager to work in play store. But, ES File Explorer is a feature rich application so you have to spend some time to learn and understand about ES File Explorer.
- Open File Manager / File Explorer / My Files on your device.
- Find a folder called SmsContactsBackup in the file manager. Please note that you will find the SmsContactsBackup folder only if you have used the same application to back up your data. If you have used another application you will get the folder name according to that application.
- Inside the SmsContactsBackup folder is a folder called contacts and sms. As the name suggests the contacts folder is used to keep all your backed up contacts and SMS folder together.
Now, you can copy or move that backup data anywhere you want. But I suggest you copy the backed up contacts and SMS to Google Drive (if you don’t know how to do that, click here). So whenever you want to access that data you can access it using your Gmail ID. For example, if your mobile is accidentally damaged and you can’t get your data back, you can use your Gmail ID to sign in on another mobile that you backed up earlier to get your data back.
How to Identify a Contact or Message file?
Most importantly, backup of contacts will be stored in contacts folder and backup of messages will be stored in SMS folder. And please note that all your data will be stored in a single file. For example, either you choose to backup 5 contacts or 500 contacts, your selected contacts will be backed up in a single file and the same applies with messages.
But, if you have stored all your backup files in a single folder, you will need to identify the file type by its extension. Your file name has a file extension at the end. You have to give the option to choose the file name when you are backing it up. But mostly people don’t save it with the chosen name. People prefer to save it with system generated name. Check the table below.
| Data | File name Starts with | File Name Extension |
| Contacts | contacts_ | .vcf |
| Messages | sms_ | .xml |
| Call Log | calllogs_ | .xml |
| Calendar | cal_ | .xml |
How to Restore Contacts
Keep in mind that you can only restore backup files that have an extension of .vcf and .xml. So if you do not have any kind of backup file then you will have to take a backup first. Click here to backup contacts or sms.
- Open the app and grant the necessary permissions when asked (if you haven’t already).
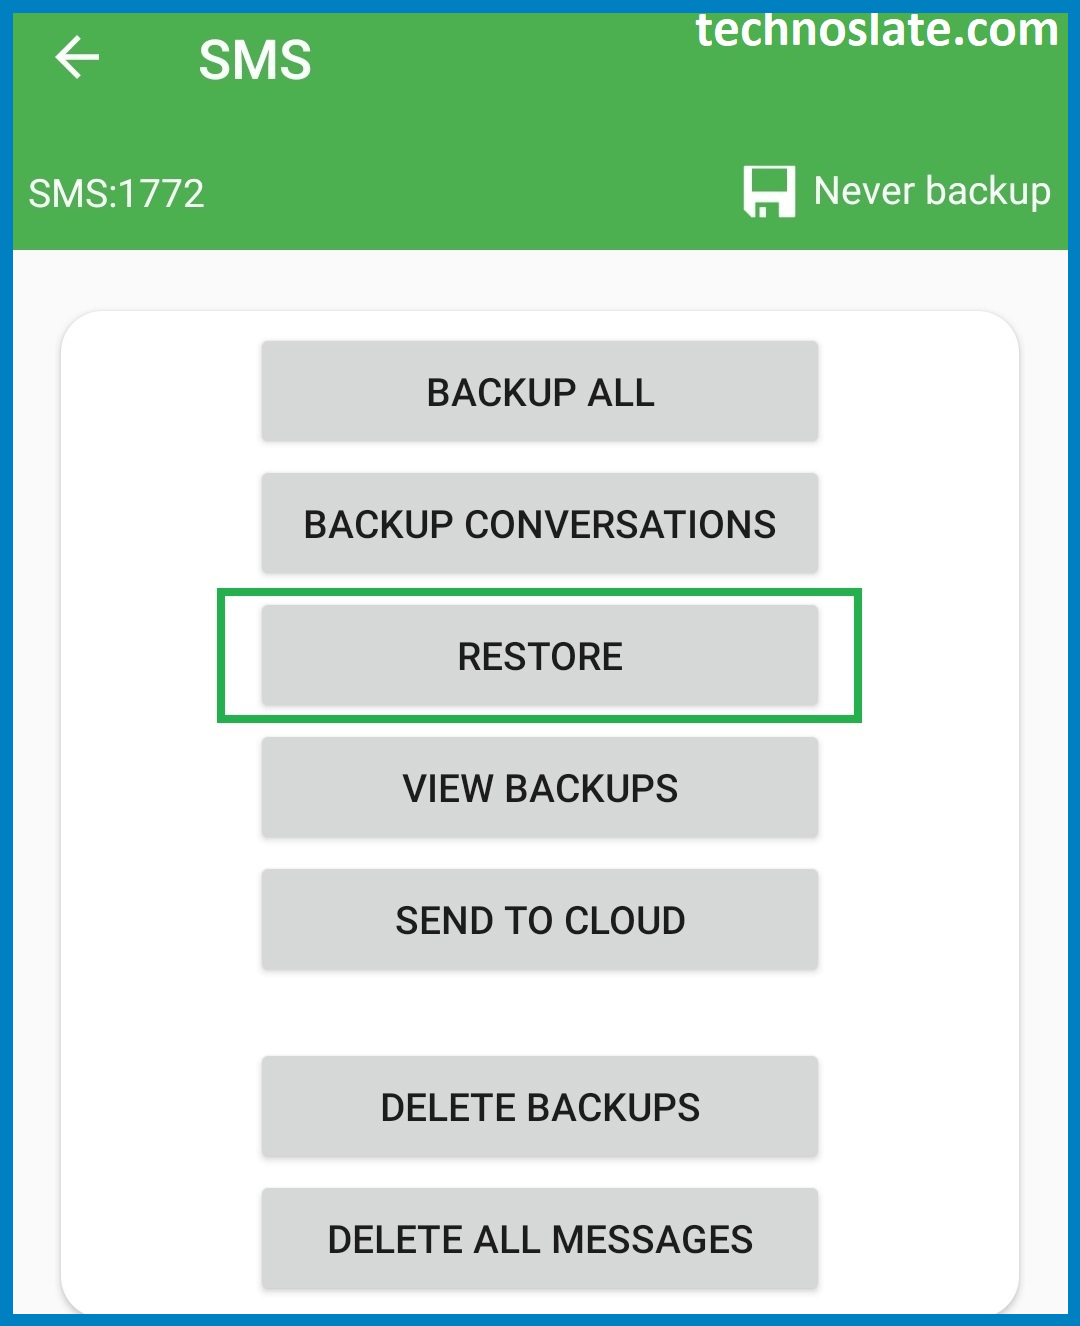
- Tap on Contacts. If you want to restore your messages you can select sms here.
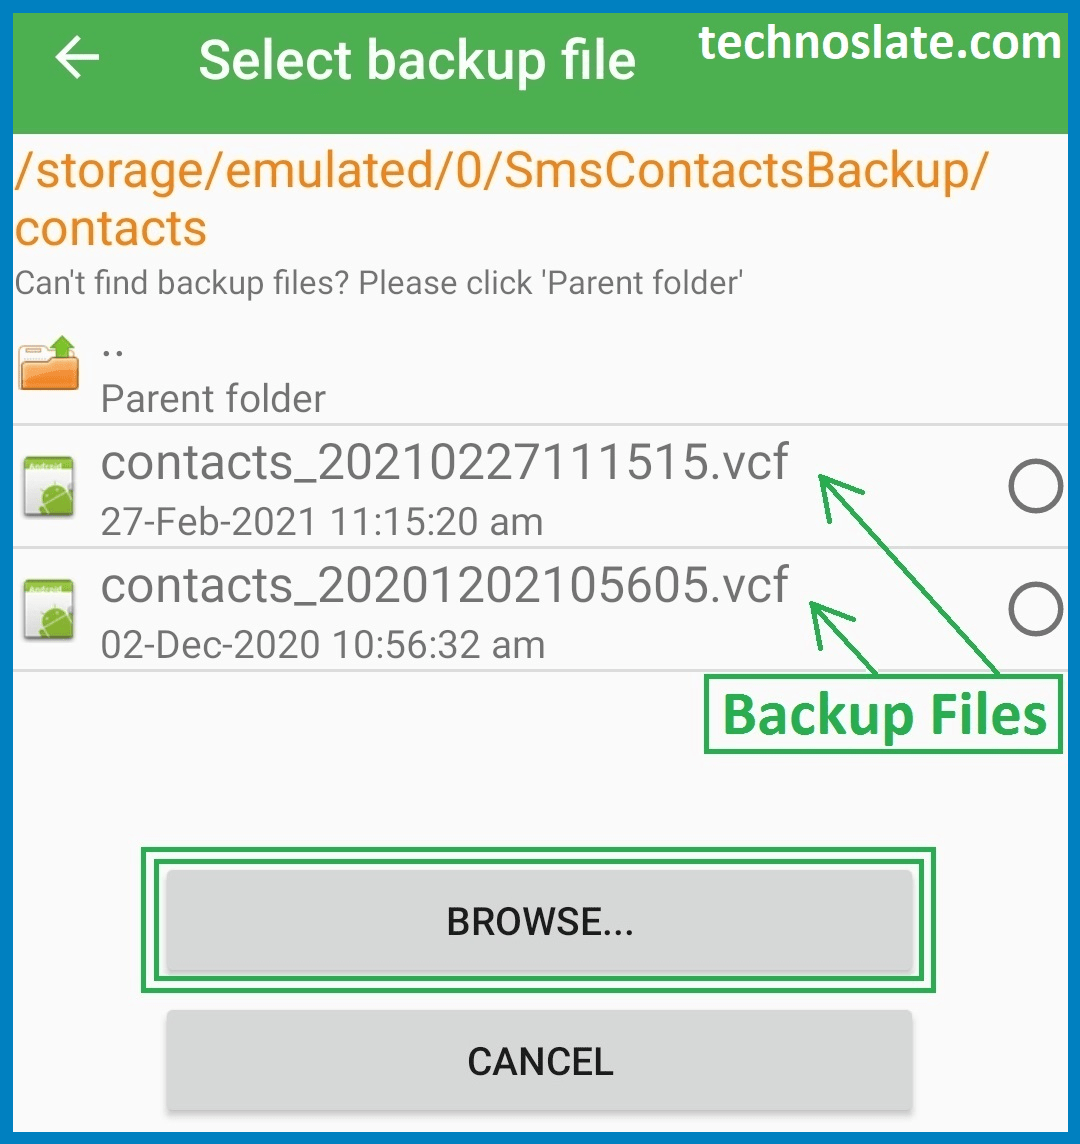
- Tap on Restore. Now, you will see the folder/directory list of your mobile. Your backup file should be available in your mobile. If not then sign in your Gmail ID and download your backed up files.
- Find the folder where you have stored/downloaded the backup file. By default your backup files are stored in the SmsContactsBackup folder.
- Select the backup file and tap on OK.
Note: You may be asked where to store your data like in your mobile or in your Google Storage. It will be much more better if you choose your Gmail ID to store your backed up files, because then your contacts will be stored in both places (mobile and Gmail contacts). Now, your contacts have been restored.
Note: You can follow the same process to restore messages. You just have to select SMS instead of Contacts. You can use this app to backup apps installed in your mobile.
How to Schedule an Automatic Backup of Contacts or SMS?
If you don’t want to backup contacts or messages or apps manually then this app can do it automatically for you. You just have to schedule your time like once a day or once a week. Let’s see how to do it.
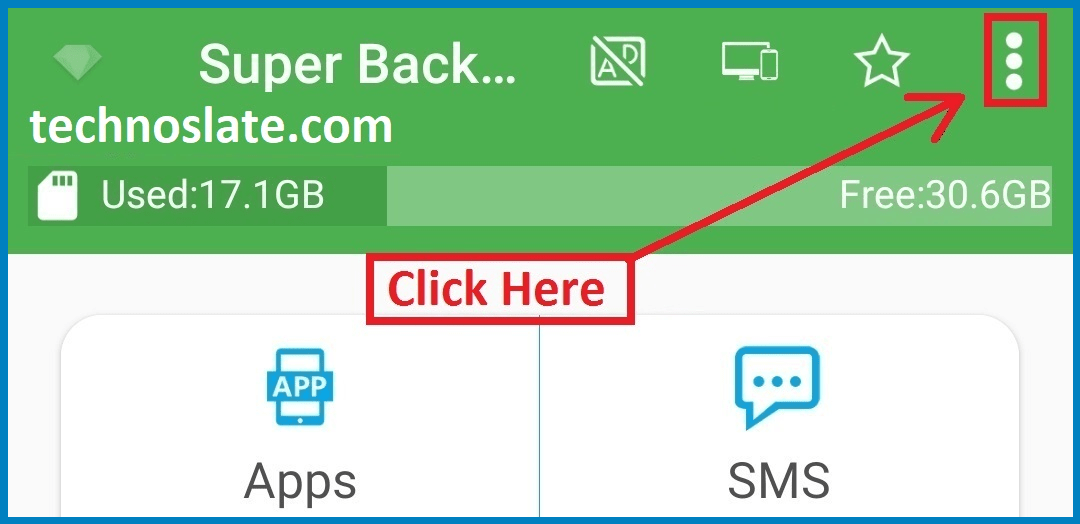
- Open the application and then open the menu. You can open the menu by tapping on the three vertical dots placed at the top-right corner of the screen.
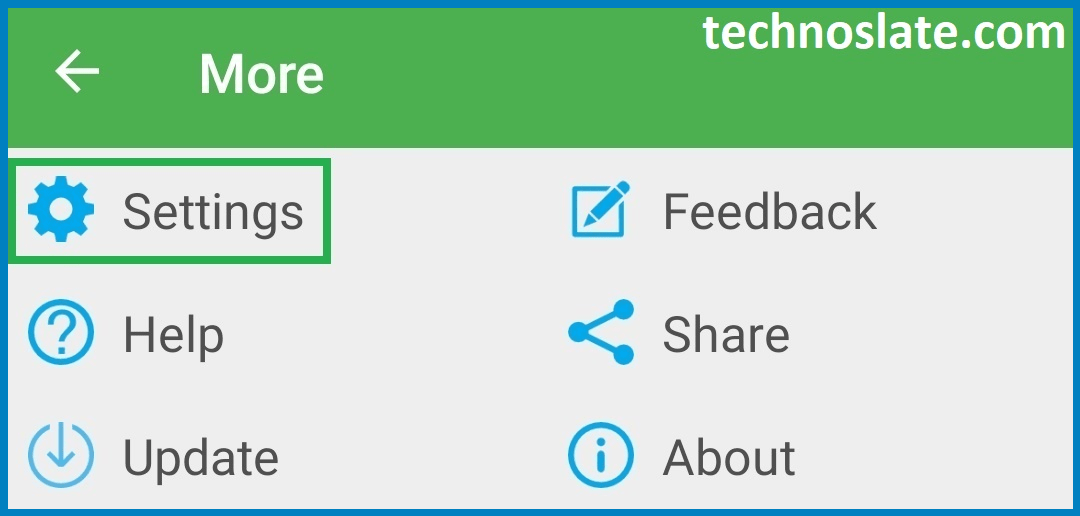
- Open Settings.
- Tap on Schedule Settings under the Scheduled Backup Header/Title.
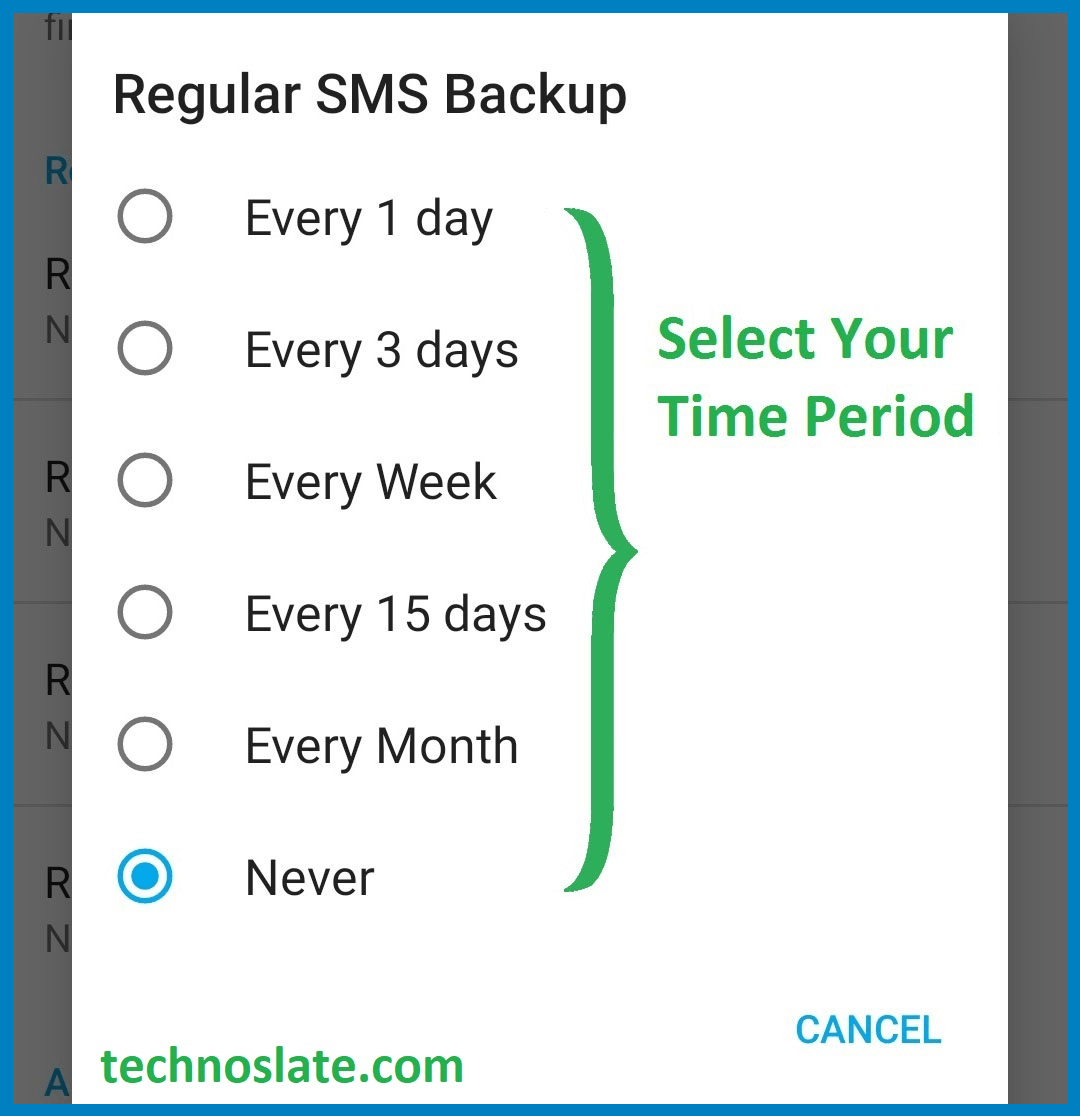
- Select Regular Contacts Backup if you want to schedule an automatic backup of contacts. You can schedule automatic backups for both and also for call logs and calendars.
- Choose your time period to set up a scheduled automatic backup every 1 day or every 3 days or every month.


How to Upload Backup Files to Google Drive?
For your future convenience, I suggest you upload your backed up files to Google Drive. Another important factor is the size of the backed up files. Yes, these files are in kb so they won’t take much space in your online storage (Google Drive Storage). But it may come in handy whenever you need it in the future.
- Open the application and then open the menu. You can open the menu by tapping on the three vertical dots placed at the top-right corner of the screen.
- Open Settings.
- Tap on Schedule Settings under the Scheduled Backup Header/Title.
- Now, under Auto-Upload Settings just check the checkbox of Upload to Google Drive.
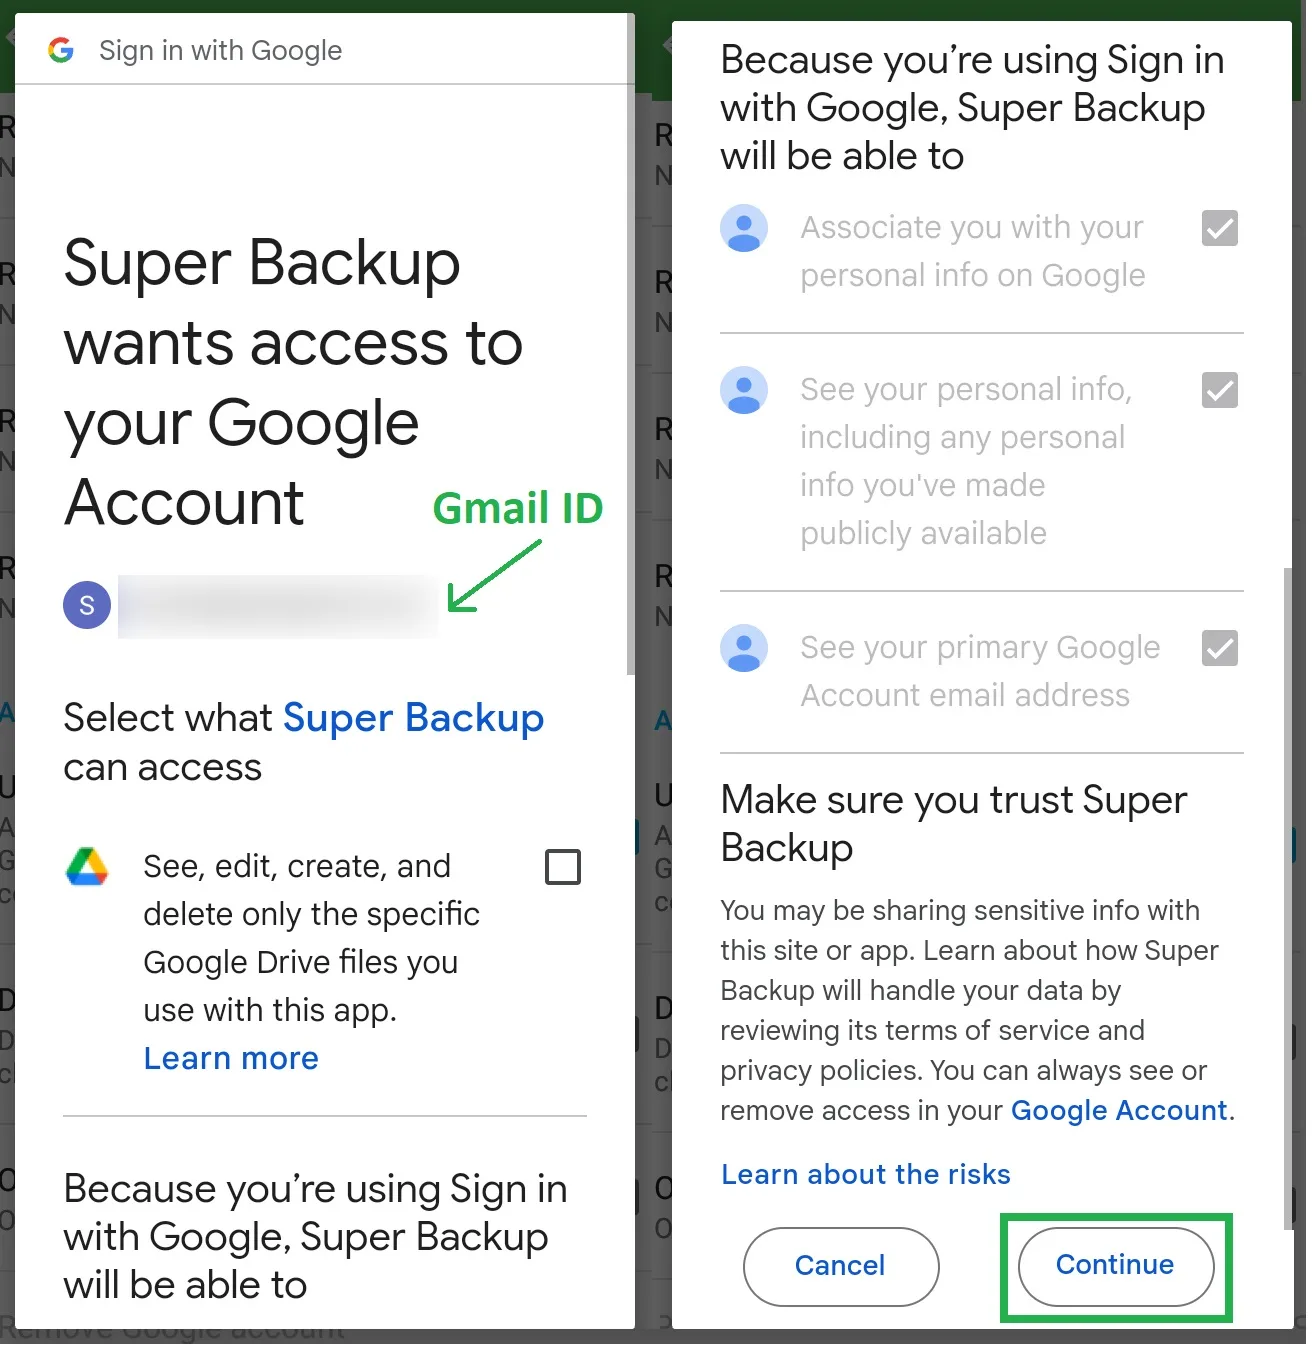
- After checking the checkbox you will see a dialog box to select your Google account where your data will be uploaded. If you have signed in to multiple Gmail IDs on your mobile, you will find all of them here. Just select your preferred Gmail ID. You will be asked for permission to read and write data.
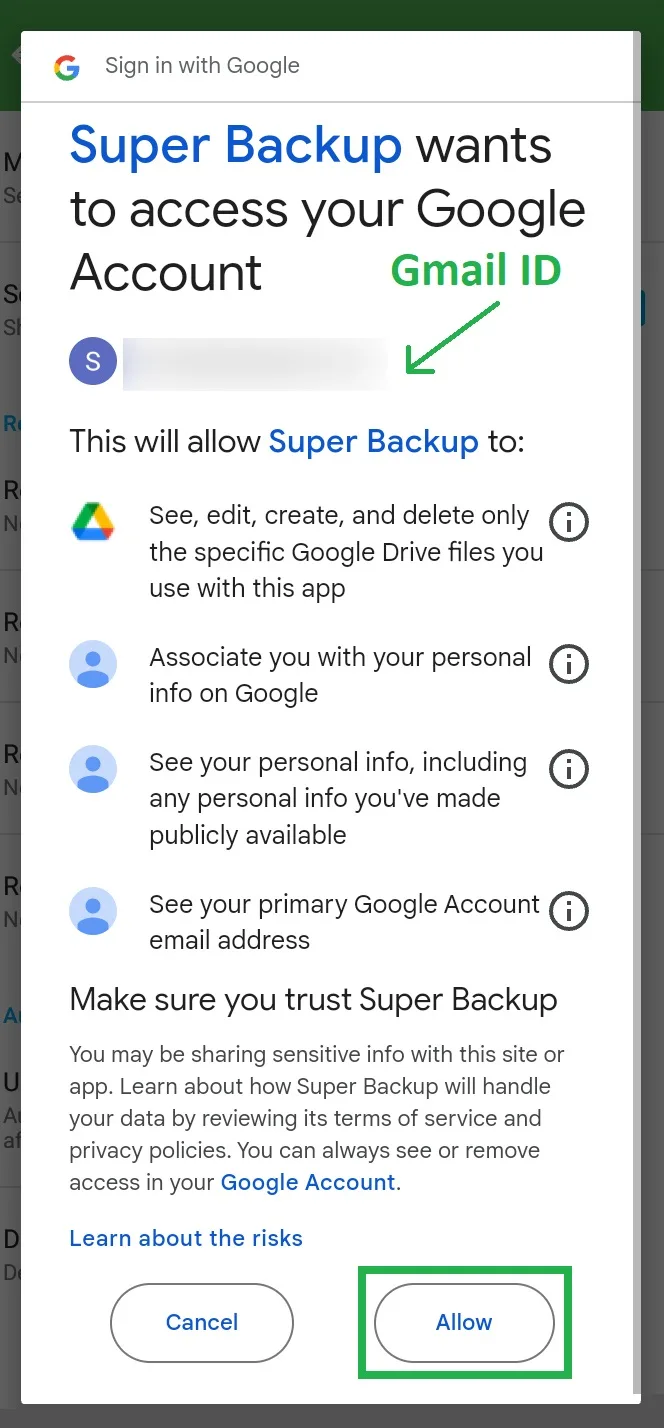
- Tap on Continue and you will be asked for permission again. Then tap Allow. Now, your backup files will be uploaded and stored in Google Drive storage in your preferred Gmail ID.


I hope this post can help you to learn about how to backup contacts and messages. If you found this post helpful, please share this post with your friends and family. If you have any question in your mind or you are facing any problem then feel free to ask your question in the comment section. We will try our best to help you. You can read more such interesting articles here.
Thank you so so much. it worked ♥️😍😊
nice information
I love this blog. Thank you so much!
Oh my god, just know about it today. Thank you so much.
You saved my tons of time bro. God Bless You!
The way of ur guiding is very “Simply”.
this app can actually save time and lot of efforts. thanks man. keep going.
Thanks, this really works.
Brother thanks so much. I have tried many but this article gave me the only solution.
nice writing with good understanding, keep on bruh
Thank you it’s working
Thanks, this really works
Very very a lot of thanks brother
I m really thankful to you,, I struggled 1.5 day for this complaint.. now I am happy. thankyou bro..
This is the best way to solve my issues ❤
Very helpful. Thanks.
Thank you. Concise and to the point. Helped out a lot!
Thanks a lot man for this ❤❤
Thanks bro. love from somalia
Great and highly informative article
Nice brother, thanks for helping ❤
Appreciated! ❤️
Thanks bro it helped me very much
I’m so grateful for this. Congratulations keep up the good work. You deserve 5 star rating ❤
Thank you bro u are a life saver❤
This was super easy and quick.. Thank you so much bro…🥰🥰
Thank bhai working ❤🎉
worked PERFECT. couldn’t have asked for a quicker more efficient article. thanks bud
Thank you so much sir 🎉👍
Thank you so much,you make it easy for me
Thanks bro you made it easier ❤ 😊 👌 👌
You are the best 💗
Thanks bro for very simply guiding
this is easy steps thanks alot
Thank you it was very helpful
Superb bro😍
Thank u so much chutki m sikhaa diyaaa yr👍🙏🙏🙏🙏🙏🙏
Thankyou soo much brdr
I m really thankful to you,, i struggled 1.5 day for this complant.. now I am happy ❤ thankyou bro..
This is the best way to solve my issues, thanks bro
Thanks for sharing
Nice Explanation
Awesome Broooooo
This was so helpful!
Really solved my phone problem
Beautiful, thank you very much.
Many many thanks brother… It’s really work..thank you
U just solved my problem dear.
thoda aur detail me likh do
Looking out for your next article
very much nice
You have mastered the art of writing. Good.
fantastic article bro
excellent bro, very much clear instructions.
Appreciated.