In the realm of spreadsheets, where data is king, ensuring the accuracy and consistency of that data is paramount. This is where Excel’s feature shines. It’s like a powerful guardian, enforcing rules and preventing invalid entries from creeping into your precious spreadsheets.
What Exactly is Data Validation?
Imagine this: you’re creating a spreadsheet to track project deadlines. Suddenly, you notice a colleague has entered Tomorrow as the due date. Or worse, someone has accidentally typed January 32nd. Chaos ensues! This is where Excel’s feature steps in, like a vigilant guardian, ensuring only valid and accurate data enters your spreadsheets.
Think of it as setting up a set of rules for each cell. This feature lets you specify exactly what kind of information is allowed to be entered. You’re essentially creating a “gatekeeper” for your data, allowing only the “good stuff” to pass through. In simple terms, allows you to set specific criteria for the data that can be entered into a particular cell or range of cells. is a set of rules that govern what is and isn’t acceptable input.
The Benefits of Data Validation
in Excel offers a significant range of benefits that enhance data quality, streamline workflows, and improve overall spreadsheet efficiency. Here’s a breakdown:
1. Enhanced Data Quality & Integrity
- Minimized Errors
- By restricting input to specific criteria, This feature significantly reduces the risk of typos, incorrect entries, and accidental data entry errors. This ensures that the data you work with is accurate and reliable.
- Consistent Data Entry
- Enforces uniformity in data entry across the spreadsheet and making it easier to analyse and interpret data. For instance, if you have a drop-down list for Department, everyone will use the same standardized terms (e.g., Marketing or Sales or IT) instead of variations like Marketing Dept. or Sales Team.
- Imagine a spreadsheet where everyone uses different terms for Yes like Yes, or Y or Yes, please. This feature ensures everyone uses the same standard terms.
- Improved Data Accuracy
- By preventing invalid entries, this feature ensures that the data in your spreadsheets is accurate and reliable. This feature helps maintain data integrity and ensures that your data is accurate and reliable for analysis and decision-making.
2. Increased Efficiency & Productivity
- Faster Data Entry
- Speeds up data entry by providing a guided and structured input process. Drop-down lists and other data validation features significantly speed up data entry by eliminating the need for manual typing and reducing the time spent correcting errors. Instead of typing out every single entry, you simply select the desired option from the list.
- Streamlined Workflows
- By automating data entry checks, This feature streamlines workflows and reduces the time spent on data cleaning and correction.
- Reduced Frustration
- By preventing invalid entries and providing clear guidance, This feature minimizes user frustration and improves the overall data entry experience.
3. Enhanced User Experience
- Guided Input
- Makes data entry more intuitive and user-friendly by providing clear guidance and preventing frustration. This feature provides a more guided and structured input process, making it easier for users to enter data correctly.
- Improved Collaboration
- When sharing spreadsheets with others, This feature ensures that everyone adheres to the same data entry standards, promoting consistency, facilitating collaboration, reducing confusion and fewer headaches.
- Clearer Communication
- By using This feature to enforce specific rules, you can clearly communicate the expected format and acceptable values for each data entry field.
4. Advanced Data Validation
- Dependent Drop-down Lists
- Imagine you’re tracking sales orders. You can create a drop-down list for “Region,” and then another drop-down list for “City” that updates based on the selected region. This creates dynamic and interconnected lists. Create dynamic and interconnected lists, where the options in one list change based on the selection in another list. This enhances data accuracy and provides a more intuitive user experience.
- Complex Validation Rules
- Utilize formulas to create sophisticated validation rules that go beyond simple data type restrictions. This allows for highly customized and tailored data entry controls.
- Combining with Other Features
- This feature can be effectively combined with other Excel features like conditional formatting and macros to create even more powerful and sophisticated data entry systems.
- Conditional Formatting
- Combine this feature with Conditional Formatting to visually highlight invalid entries. This makes it easy to spot and correct errors quickly.
- Macros
- For advanced users, you can use macros to automate the creation and management of rules.
How to Use
- Select the Cells: Select the cell(s) where you want to apply rules.
- Access
- Excel 2007 and later: On the Data tab, click in the Data Tools group.
- Excel 2003: Select Data from the menu bar, then Validation.
- Choose Validation Criteria:
- Allow:
- Any value: Allows any data to be entered.
- Whole number: Restricts input to integers (whole numbers).
- Decimal: Allows decimal numbers.
- List: Allows selection from a predefined list.
- Date: Restricts input to valid dates.
- Time: Restricts input to valid times.
- Text Length: Limits the number of characters.
- Custom: Allows for more complex validation rules using formulas.
- Data:
- Between: Specify a range of acceptable values (e.g., between 1 and 100).
- Not between: Specify a range of unacceptable values.
- Equal to: Specify a specific value.
- Not equal to: Specify a value that is not allowed.
- Greater than: Specify the minimum acceptable value.
- Less than: Specify the maximum acceptable value.
- Greater than or equal to: Specify the minimum acceptable value, inclusive.
- Less than or equal to: Specify the maximum acceptable value, inclusive.
- List: (If Allow is set to List)
- Source:
- Type the list directly (separated by commas, semicolons, or spaces).
- Select a range of cells containing the list.
- Select a named range.
- Allow:
Data Validation Example
As shown in the image, we are going to learn about applying multiple data validation rules like prevent entering digits in the cell, allow only digits, accept date within the specified range, limit the number of characters, minimum and maximum character limit to be entered in an Excel cell, etc.

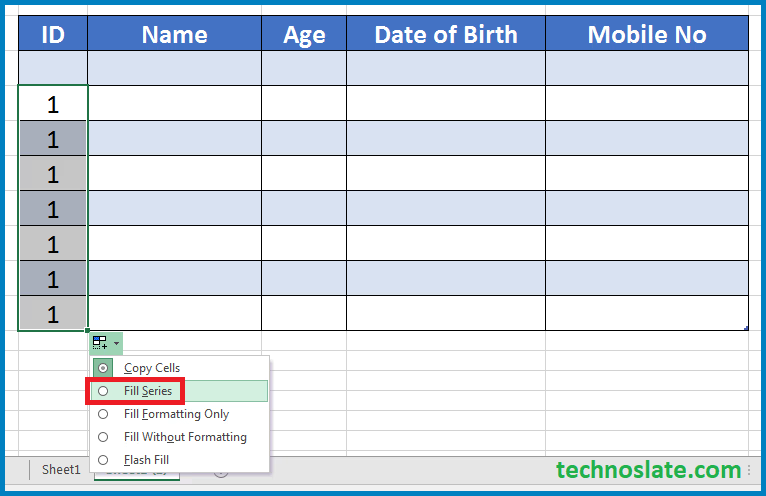
Auto Increment for ID Column:
- Enter the number 1 in the first cell where you want to start.
- Click on the fill handle (the small square in the bottom-right corner of the selected cell).
- Drag the fill handle to the right until you reach the 7th cell.
- Release the mouse click and system will show you a menu. Select the option Fill Series. As you select the option, excel will automatically fill the numbers in a series (1, 2, …, 7).
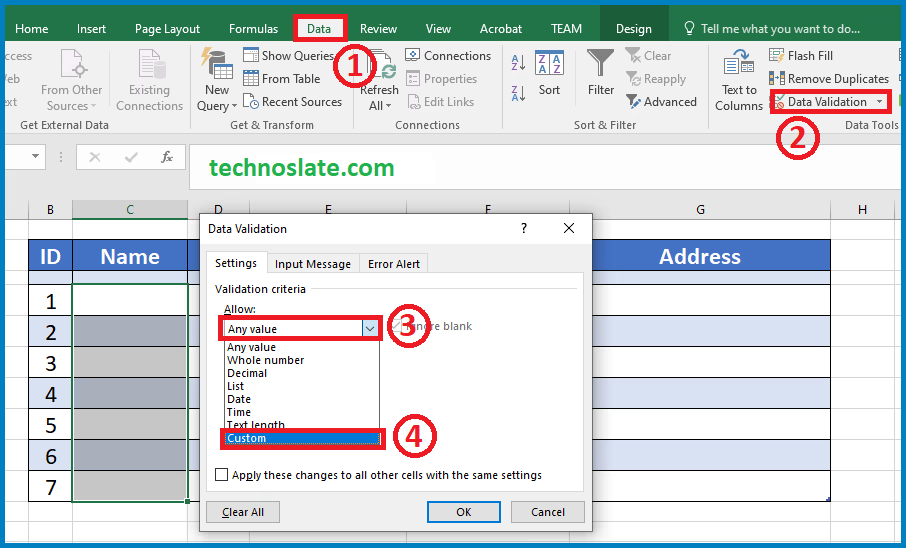
Data Validation for Name Column:
- Select the single cell where you want to apply data validation. Click on Data tab.
- Select Data Validation in Data Tools group.
- Click on dropdown list under Allow.
- Select the option Custom.
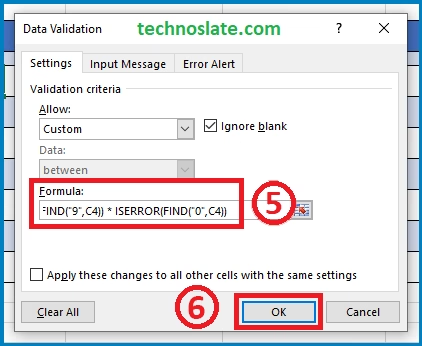
- Copy the formula given below and paste in Formula text box. Please note that we are using the cell E5 for example. You have to replace the cell number with E5 in the formula given below.
- Formula: =ISERROR(FIND(“1”,E5)) * ISERROR(FIND(“2”,E5)) * ISERROR(FIND(“3”,E5)) * ISERROR(FIND(“4”,E5)) * ISERROR(FIND(“5”,E5)) * ISERROR(FIND(“6”,E5)) * ISERROR(FIND(“7”,E5)) * ISERROR(FIND(“8”,E5)) * ISERROR(FIND(“9”,E5)) * ISERROR(FIND(“0”,E5))
- Click on OK button. Then drag the fill handle to down side until you reach the last cell.
Now, for rest of the columns repeat the steps from 1 to 4 as we did in the name column and then just change the formula (or data validation field) as per column requirements.
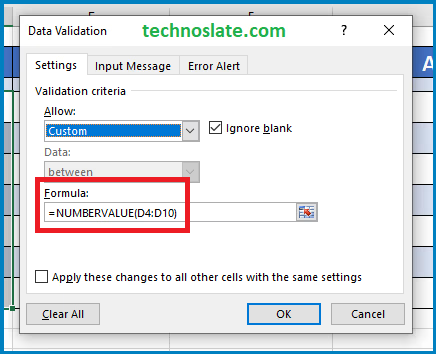
Data Validation for Age Column:
- Formula: =NUMBERVALUE(D4:D10) (Where D4:D10 is the cell range being validated, you can select your own cell range.)
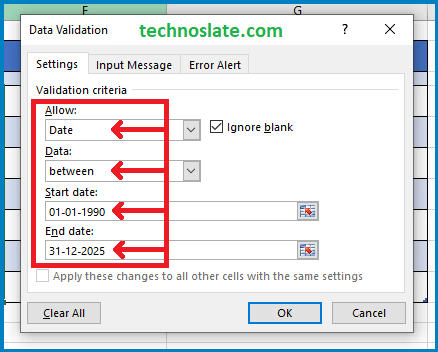
Data Validation for Date of Birth Column:
- Select Date for Allow.
- Select between for Data.
- In Start date and End date you can choose the dates as per your needs.
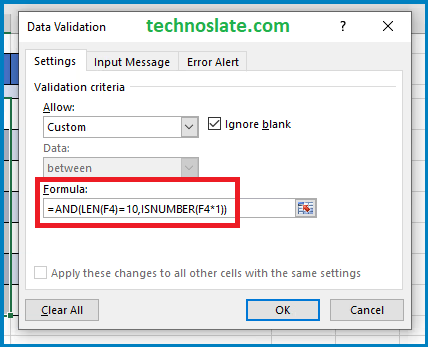
Data Validation for Mobile No. Column:
- Formula: =AND(LEN(F4)=10,ISNUMBER(F4*1)) (Where, F4 is the selected cell, you can go for different cell. Click on OK button.)
- In the next step, select the cell to which you applied the data validation rule and then drag the fill handle downward until you reach the last cell. Excel will apply the validation rule to the selected cell range.
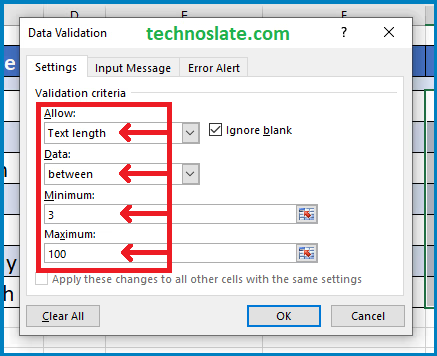
Data Validation for Address Column:
- Select Text length for Allow.
- Select between for Data.
- In Minimum and Maximum you can enter the number as per your requirement.
Input Message:
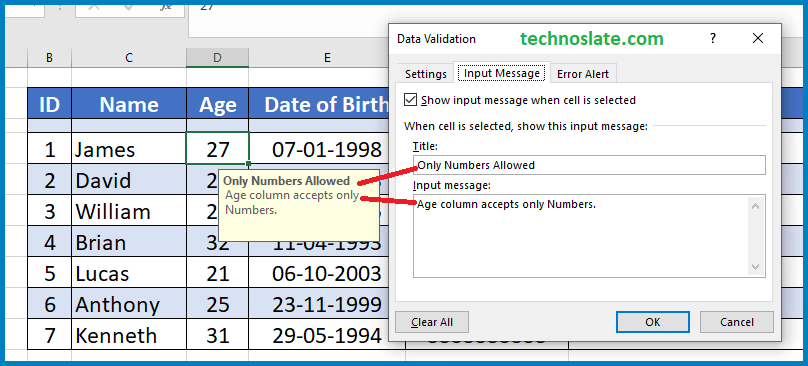
- Show input message when cell is selected: Check this box to display a helpful message to the user when they select the cell.
- Title: Enter a title for the message.
- Input message: Enter the message to be displayed.
Error Alert:
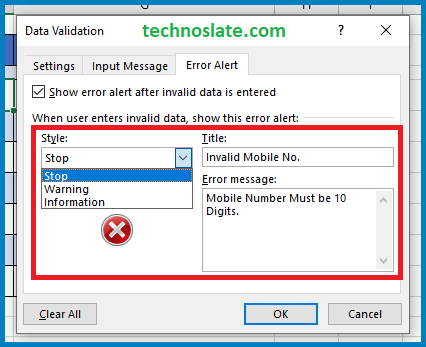
- Show error alert after invalid data is entered: Check this box to display an error message to the user if they enter invalid data.
- Title: Enter a title for the error message.
- Error message: Enter the message to be displayed. Click OK.
- Message Style:
- Stop: Prevents the user from entering invalid data.
- Warning: Allows the user to enter invalid data but displays a warning message.
- Information: Displays an informational message but allows the user to enter invalid data.
Tips for Input Message and Error Alert
- Use clear and concise messages in input message and error alert to guide users.
- Test your data validation rules thoroughly to ensure they work as expected.
- Consider using named ranges to make your data validation rules easier to manage.
Conclusion
Data Validation is a powerful tool that can significantly improve the accuracy, consistency, and overall quality of your data. It’s like adding a layer of protection to your spreadsheets, ensuring that only valid and reliable information makes it through. So, embrace the power of Data Validation and take control of your spreadsheet data today! You’ll be amazed at how much time and frustration it can save you.
This tutorial should give you a good foundation for using data validation in Excel. You can explore the different options and customize them to suit your specific needs. I hope this helps! Let us know if you have any further questions. We will try our best to help you. You can read more such interesting articles here.
I’m impressed, I need to say. Really hardly ever do I encounter a weblog that’s both educative and entertaining, and let me let you know, you could have hit the nail on the head. Your idea is outstanding; the difficulty is something that not enough individuals are talking intelligently about. I’m very pleased that I stumbled across this in my seek for one thing regarding this.