Improving the Windows 11 performance can significantly enhance your computing experience, making your system faster, more responsive, and more efficient. Whether you’re using a desktop, laptop, or tablet, there are several strategies you can employ to boost your system’s performance. Here are some effective tips to help you improve the Windows 11 Performance.

Update Your System
Ensure that your Windows 11 is up to date. Microsoft frequently releases updates that not only include security patches but also performance improvements and bug fixes. To check for updates, go to Settings > Update & Security > Windows Update and click on Check for updates.
Limit Background Apps
In Windows, apps can continue to perform actions even when you are not actively in the app’s window. These are commonly called background apps. Background apps can consume system resources and affect Windows 11 Performance. To limit them and to choose which apps can run in the background, let’s follow the steps given below.
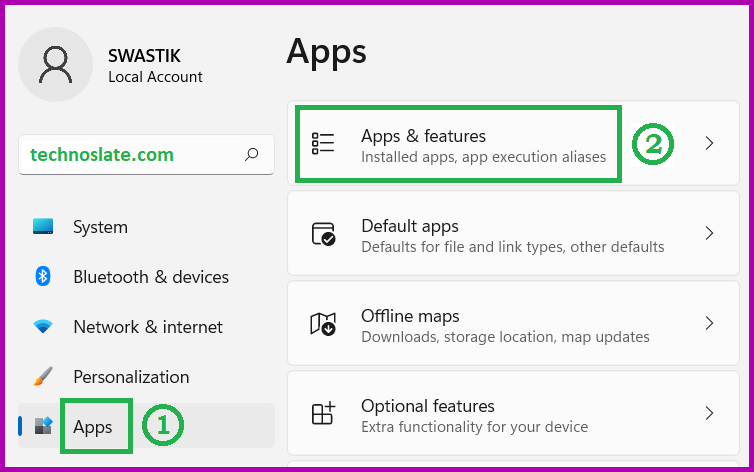
- Open the Start menu and type Settings followed by pressing ENTER. Now, choose Apps from left side menu and then click on Apps & features from the options available on right side.
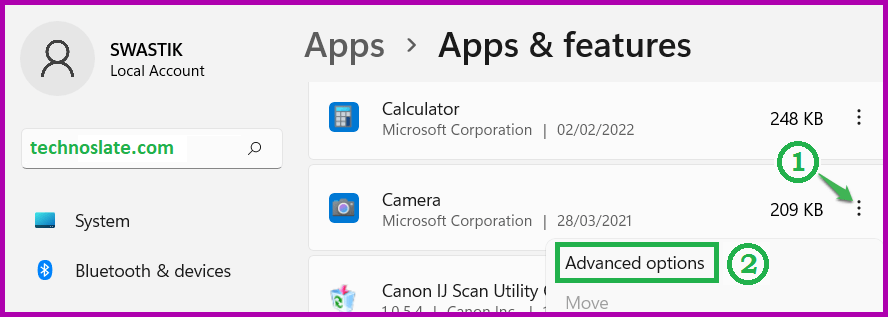
- Select the application from the list and click on three dotted menu on right side. Select the Advanced Options.
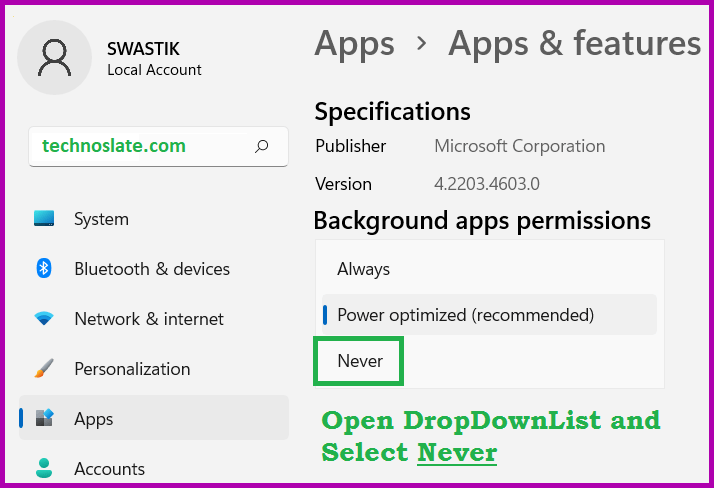
- Select an option Never from the dropdown list. Selecting this option will ensure that this application will never run in the background.
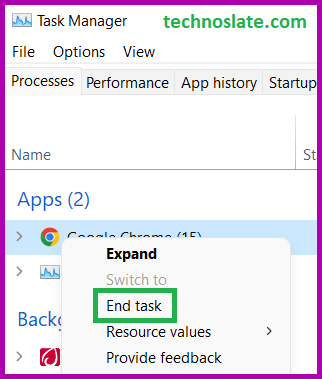
- There is another way by which you can close the application running in the background for some time, by doing this your application will close only for some time and as soon as your device restarts this application will start again. Open Task Manager by pressing Ctrl + Alt + Esc together. In the Processes tab, select the application that you want to stop in the background. Now, select the End Task option.
Delete Temporary and Unwanted Files
Temporary files could be a reason to slow down Windows 11 Performance. Temporary files are created by programs on your computer to hold data while a permanent file is being written or updated. The data from temporary files is transferred to a permanent file when the task is complete or when the program is closed. Temporary files also known as temp or tmp files.
These files are created by various programs during their operation and are intended to be temporary placeholders. Over time, they accumulate and can consume a significant amount of storage space. Temp files often have the extension .tmp and are stored in the C:\Users\AppData\Local\Temp folder and temporary files can be delete from the %temp% folder.
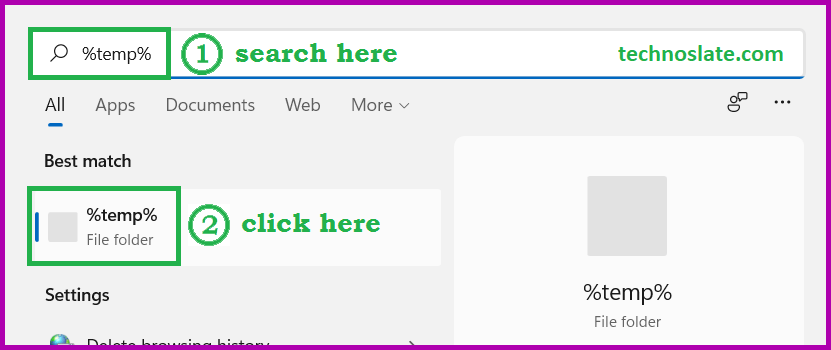
- Open Windows search bar and type %temp% and then click on it.
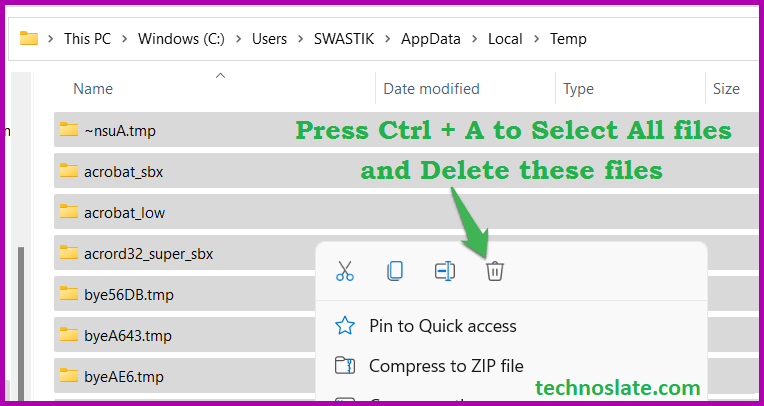
- Press Ctrl + A to select all files. Do Right click on selected files and click on the trash (delete) icon of the right click menu to delete selected files.
Keep Drivers Updated to Improve Windows 11 Performance
Outdated drivers can cause Windows 11 Performance issues. Use the Device Manager to check for updates for your hardware drivers. You can also visit the manufacturer’s website for the latest drivers.
Adjust Visual Effects
Windows 11 offers various visual effects that can impact Windows 11 Performance. To adjust these, go to Settings > System > About > System info > Advanced system settings > Settings under Performance. Here, you can choose to adjust for best Windows 11 Performance or customize settings to suit your preference.
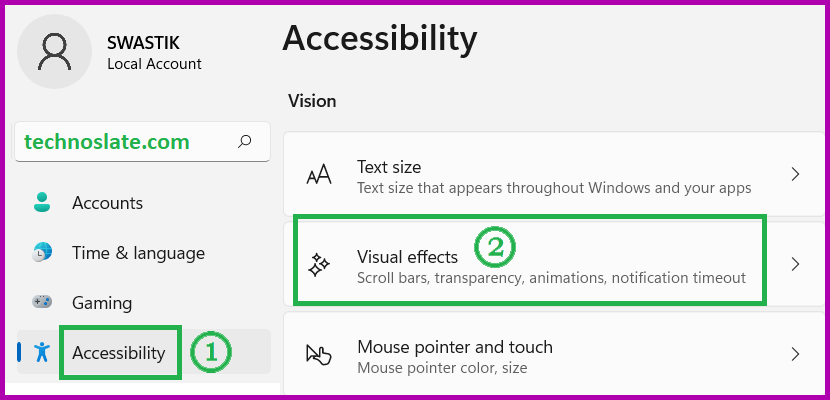
- Open Settings. Click on Accessibility from left side menu. Select Visual Effects from the options on the right side.
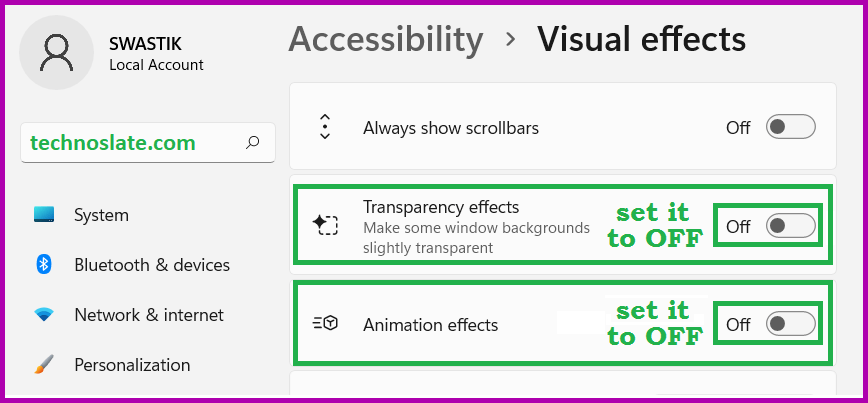
- Turn Off the button for Transparency Effect and Animation Effects.
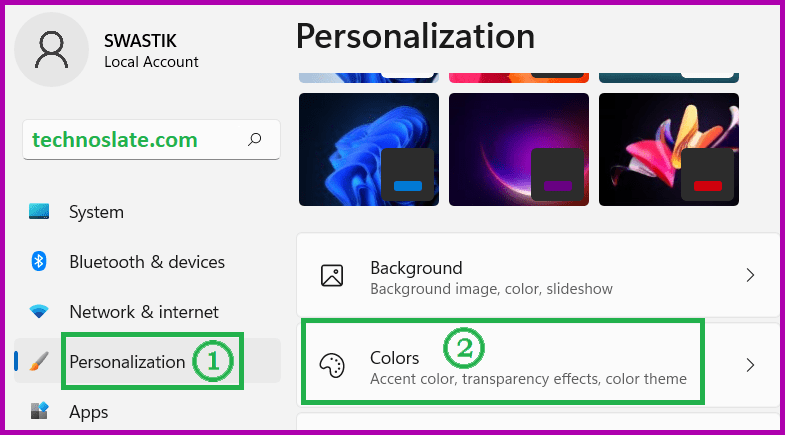
- Open Settings. Click on Personalization from left side menu. Select Colors from the options on the right side.
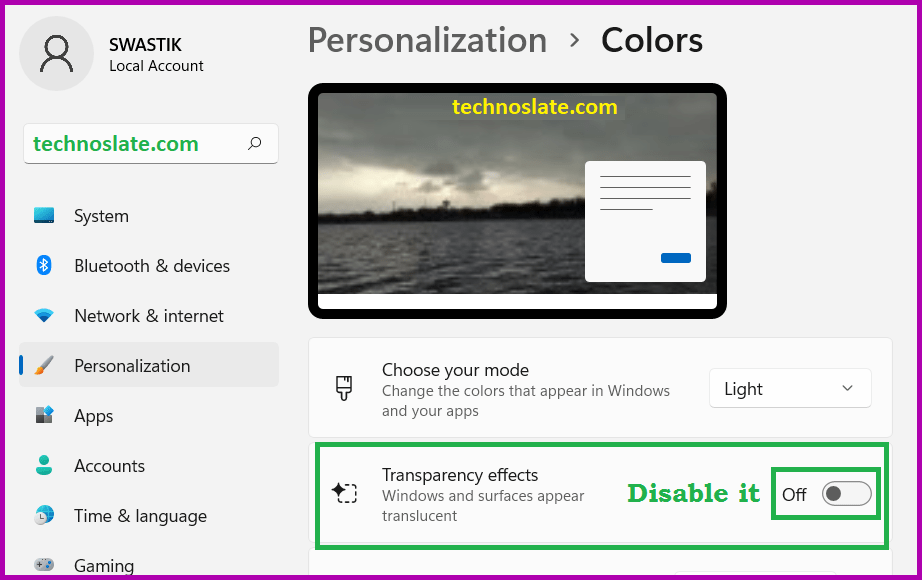
- Turn Off the button for Transparency Effect and then close the window.
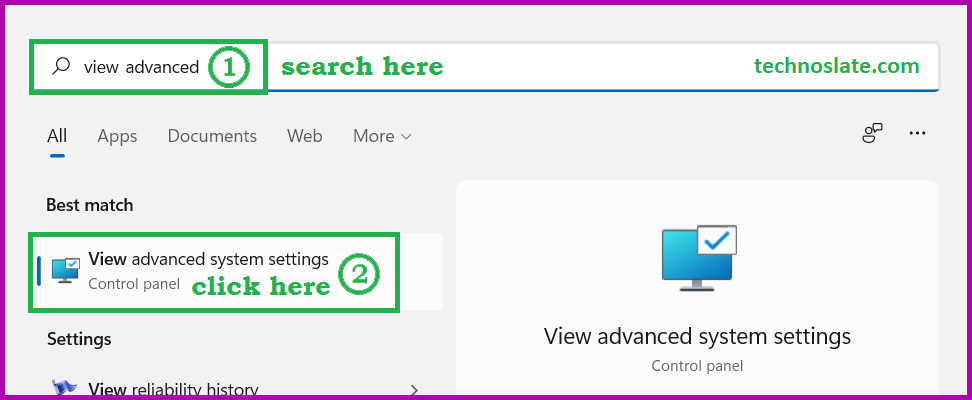
- Press the windows button and search for View advanced system settings.
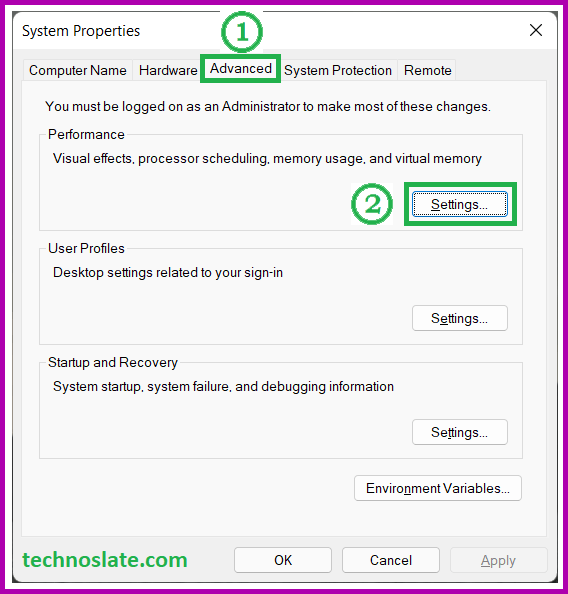
- Go to the Performance tab and click on Settings under Performance (as shown in image).
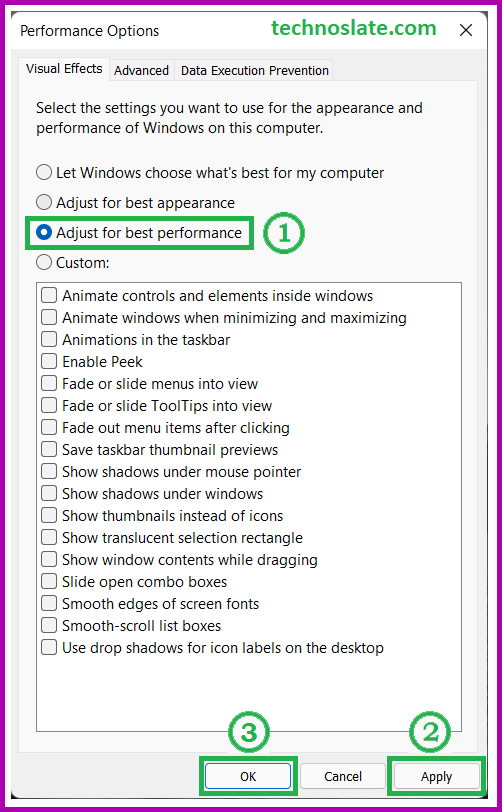
- It will show you available Performance options. Select the option Adjust for best performance. Then click on Apply and then OK.
Defragment and Optimize Hard Drives
Over time, adding and deleting files on your hard drive can cause data clutter, especially if you are running low on storage space. This typically happens when you install an application or delete a large number of files. If files are stored in contiguous areas on your hard drive, the system has to do extra work to retrieve them from the hard drive.
Defragmentation improves disk speed and Windows 11 performance by organizing individual files. It frees up unused storage space. Defragmentation helps you make the most of the unused space on your hard drive. To reduce fragmentation, disk optimization tools typically use compaction to free up larger areas of disk space.
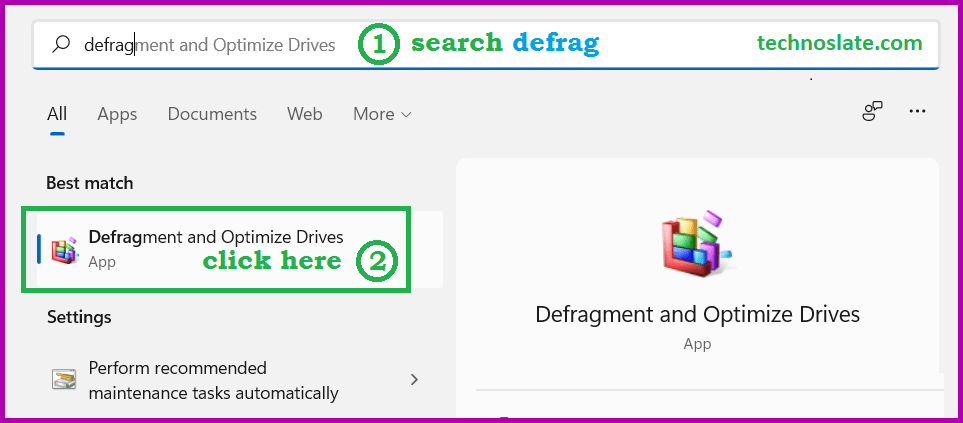
- Press windows button and search for Defrag and then open an application Defragment and Optimize Drives.
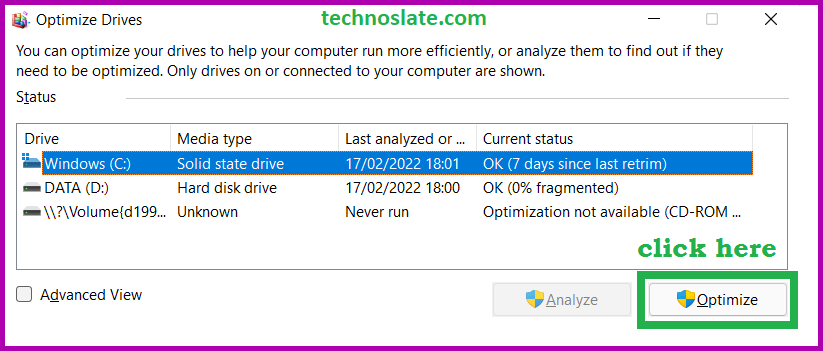
- Select Windows (C:) and click on button Optimize.
For traditional hard drives, defragmenting can improve Windows 11 Performance by organizing data so that it can be accessed more quickly. For SSDs, optimization is recommended instead. You can use the built-in Defragment and Optimize Drives tool found in the Start menu.
Keep in mind, if you are using an SSD, defragmentation is not recommended. It will reduce your SSD’s life.
Use Disk Cleanup
Over time, your system accumulates temporary files, system error memory dump files, and other unnecessary files that take up space and can slow down your PC. Use the built-in Disk Cleanup tool to remove these files. You can find it by searching for Disk Cleanup in the Start menu.
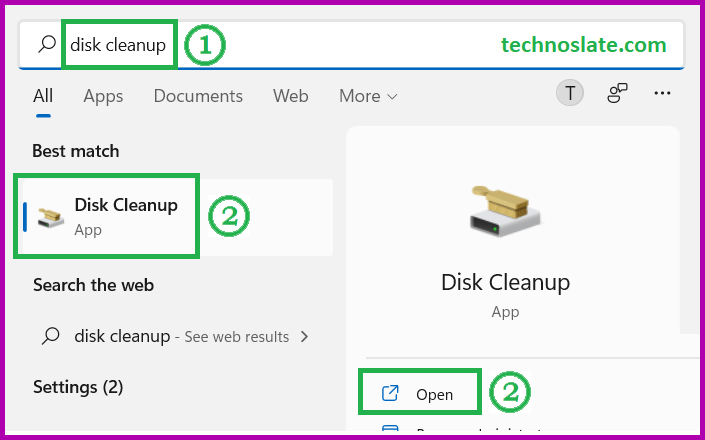
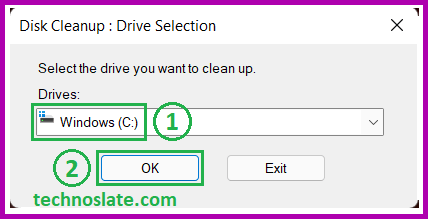
- Press windows button and search for Disk Cleanup and then open an application.
- Select Windows (C:) and click on button OK.
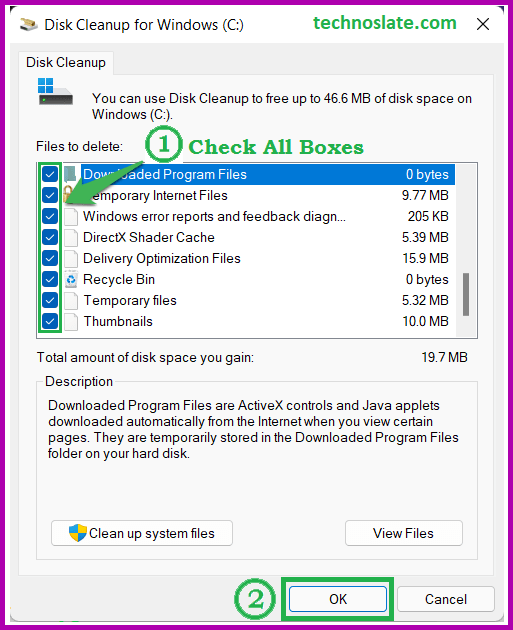
- It will show you a list of Files to Delete. Just Check them all (as shown in image). Then click on OK.
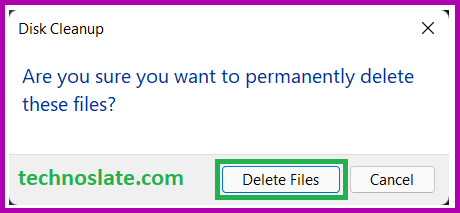
- A system will show you confirmation message to delete selected files. Click on button Delete Files.
Disable Game Mode
Why should we Turn Off the Game Mode to Improve Windows 11 Performance?
- Windows 11 has new features that Windows 10 doesn’t, like Auto HDR and optimizations for windowed games, which can reduce game latency and improve visuals. Game Mode is usually enabled by default in the latest versions of Windows 11.
- Game Mode deactivates background activities like Windows updates and app notifications to help your computer boost FPS in your games.
- Windows updates are suspended when Game Mode is active.
- Game Mode Prevents Windows Update from performing driver installations and sending restart notifications.
- Game Mode gives your game higher priority access to your CPU and GPU.
- Game Mode optimizes your system for maximum performance while gaming.
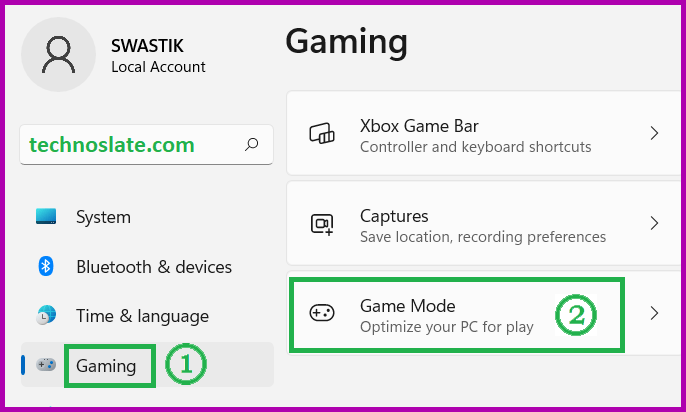
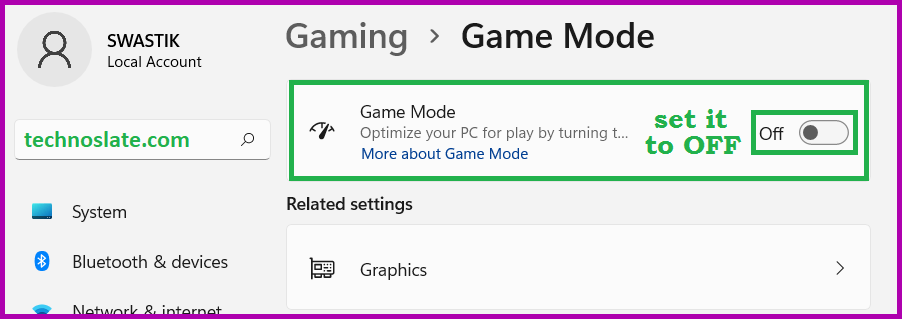
- Open Settings followed by windows button and click on Gaming.
- Turn OFF the button of Game Mode.
- Now, open the settings for Xbox Game Bar under Gaming. Turn OFF the button for Open Xbox Game Bar using this button on.
Note: If you want to enable game mode while gaming, Open any game on your computer. When the game launches, press the Windows button and G. This will open the Xbox Game Bar where you can adjust the settings however you want to improve Windows 11 Performance.
Disable Startup Programs
Your Windows 11 Performance could be hilariously slow if programs you rarely or never use are running in the background. Disabling those programs can make your PC run faster and can improve windows 11 performance very easily.
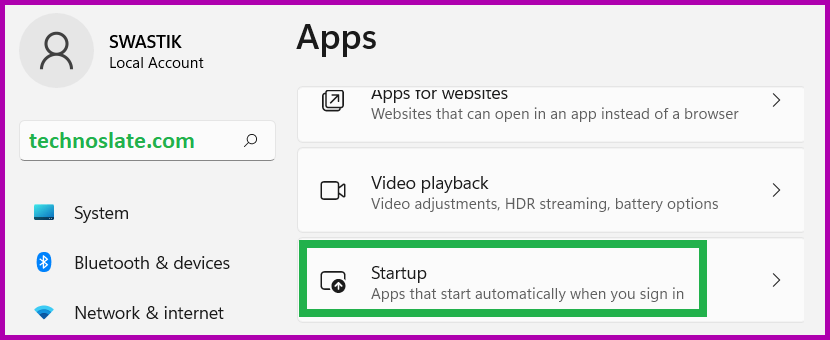
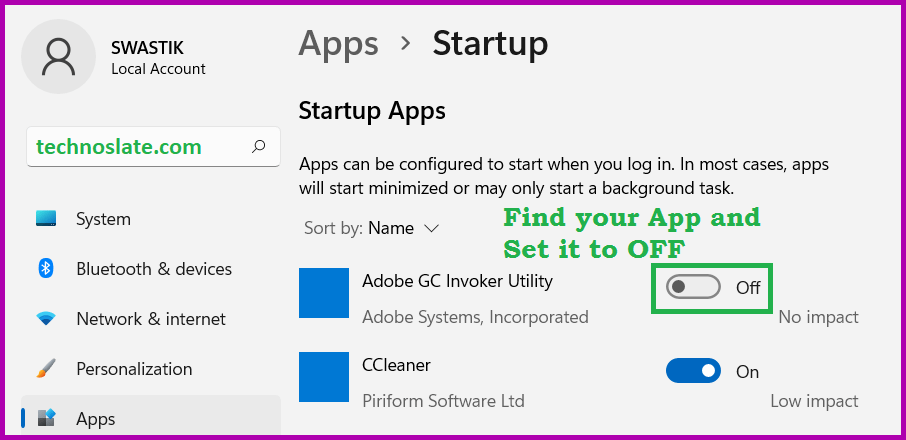
- Go to the Apps in Settings. Click on Startup. It will show you the list of installed applications.
- Go through the list and Turn OFF the button for the applications you don’t want to launch at the startup.
Too many programs starting up with Windows can slow down your system. To disable these startup programs using Task Manager you can try one of the following ways:
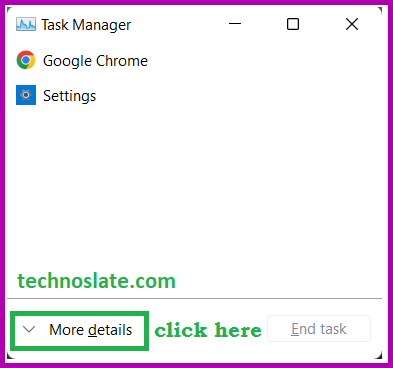
- (1) Press Ctrl + Alt + Delete simultaneously, (2) Press Ctrl + Shift + Esc simultaneously, (3) Open windows search box by pressing windows button on keyboard and search for Task Manager, and press Enter. Click on More details.
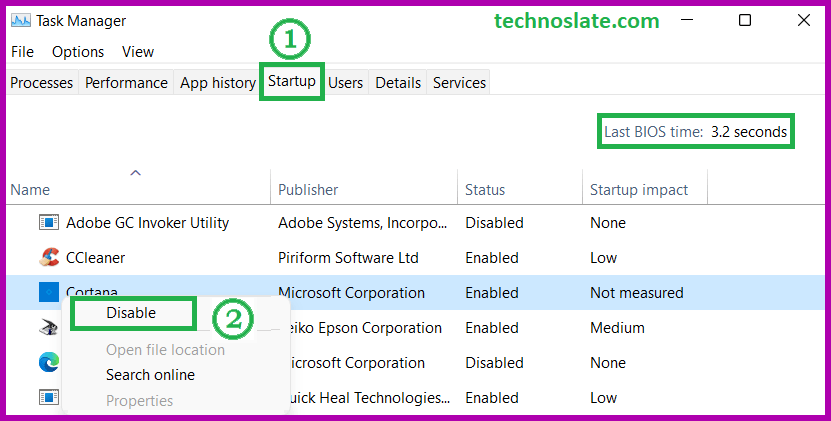
- Switch to the tab name Startup. You can see here list of startup applications.
- Find the application you want to disabled at startup and do right click on it and then select option Disable. FYI, please note the Last BIOS time written at right side on the window. You will note the boot time improvement (at next time boot) after you disable the some of the applications.
After opening task manager, go to the top forth tab from left side panel named Startup Apps. There is much more information available about listed applications like app name, publisher, status and most important is startup impact. If status is disabled then it will not impact startup procedure but if the status is enabled then it might slow down windows startup progress and can affect windows 11 performance.
To disable unnecessary startup programs, do the right click on app name and select option Disable. Keep in mind that, disabling an app from startup, will not block entire app to run, it will just prevent the app from being executed at startup time. If you have disabled a wrong app by mistake, you can also enable by following same steps. You will just have to select option named Enable.
Most of the applications in the list would known for you like Cortana, Microsoft Edge or OneDrive. But now here comes the notable question. and the question is that if you don’t know about the app what should you do in that situation? Will you disable the app or leave it as it is? At that time you will think whether I should block it or not? Don’t worry. Question always come with its own answer. The answer to your question is hidden in the question itself. And the answer is that https://www.shouldiblockit.com. Go to the website shouldiblockit.com and search for the app or file name. You will find an very informative details for that application/service.
After finishing the task of disabling all unnecessary/unwanted startup apps, next time you restart your device, you might be find improved Windows 11 Performance, because this time your machine on’t launch those unnecessary programs automatically which you have disabled for the startup. So, kindly restart your device after disabling startup apps to check whether your Windows 11 Performance has improved or not.
Disable Notifications and Tips
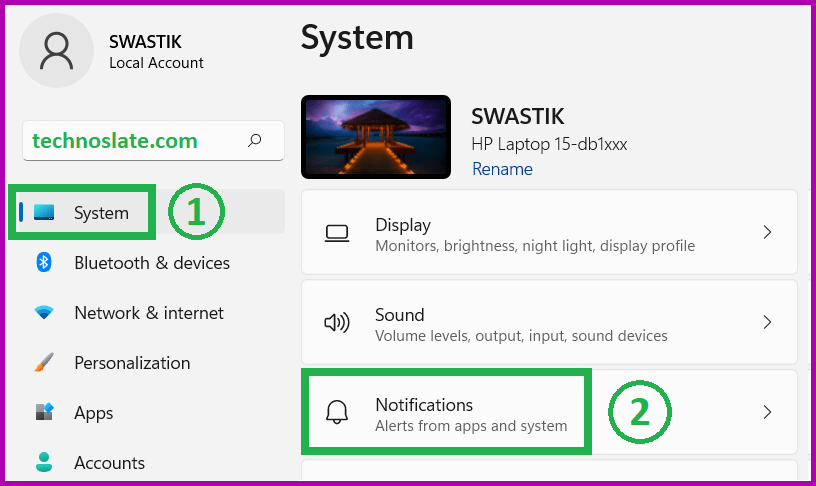
Windows 11 occasionally shows tips and tricks, which can be distracting and consume system resources and ultimately it can cause slow Windows 11 Performance. To disable them, go to Settings > System > Notifications and turn off the option for tips and tricks.
- Go to the system Settings and click on System and then Notifications.
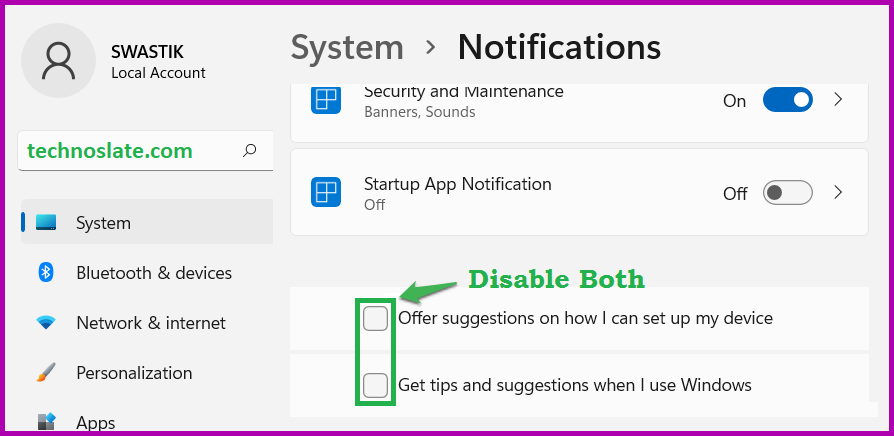
- Scroll to the down side and uncheck both of the boxes as shown in the image.
Role of VBS in Windows 11 Performance
In Windows 11, VBS stands for Virtualization-Based Security. Actually, VBS is a really important security feature. VBS protects the operating system and device from malware and other attacks and it also enforces restrictions to protect security assets like authenticated user credentials. So, we can say that VBS has a very special role in windows 11 performance.
VBS uses hardware virtualization and the Windows hypervisor to create an isolated virtual environment and it will use system resources more than your expectation. and that’s why some users have reported up to 15-28 percent increases in performance when disabling the feature, although your percentage may vary. But if you are someone who uses their system for confidential official work, it is best to keep VBS enabled.
Previous Installations
Why does Windows 11 store Previous Installations?
If any problem arises after installing Windows 11 or after upgrading Windows 10 to Windows 11, then you can use these previous installations to solve that problem.
For example, you can use system restore point to restore at previous date or you can reinstall windows 11 or you can also roll back to windows 10. In fact, ten days after you upgrade to Windows, your previous version of Windows will be automatically deleted from your PC. However, if you need to free up drive space for more storage, and you are confident that your files and settings are where you want them to be in Windows, you can safely delete it yourself anytime.
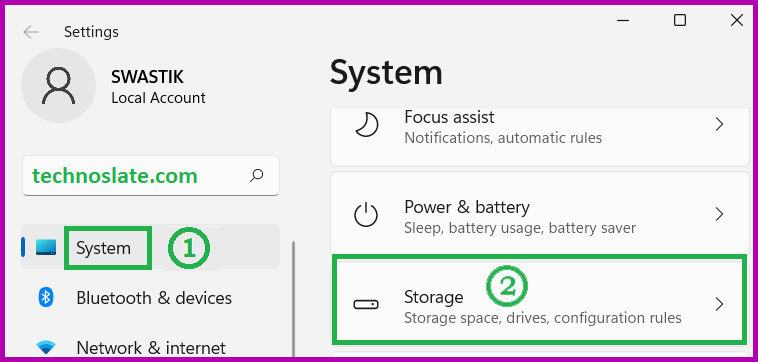
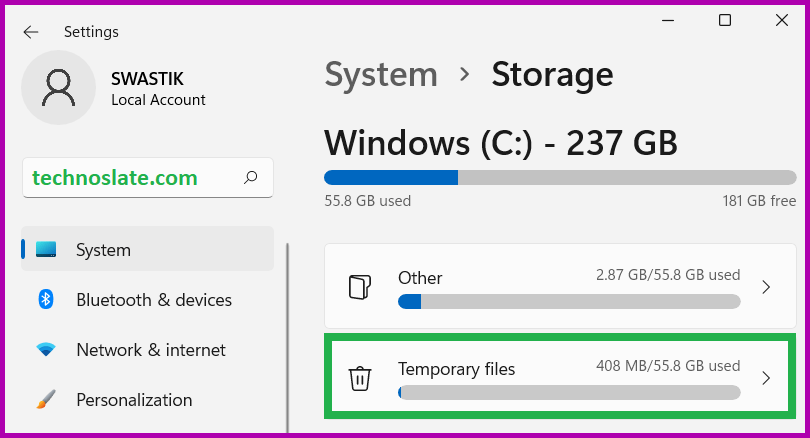
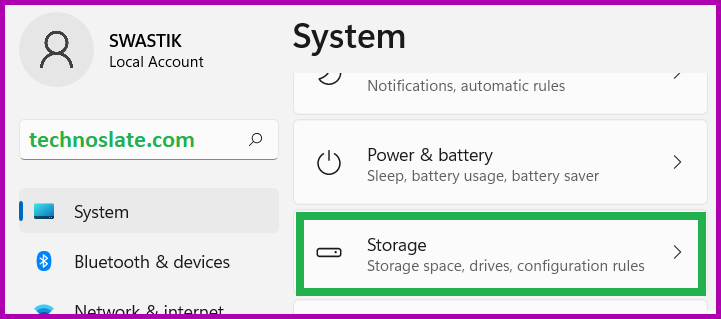
- Open Settings and then Storage.
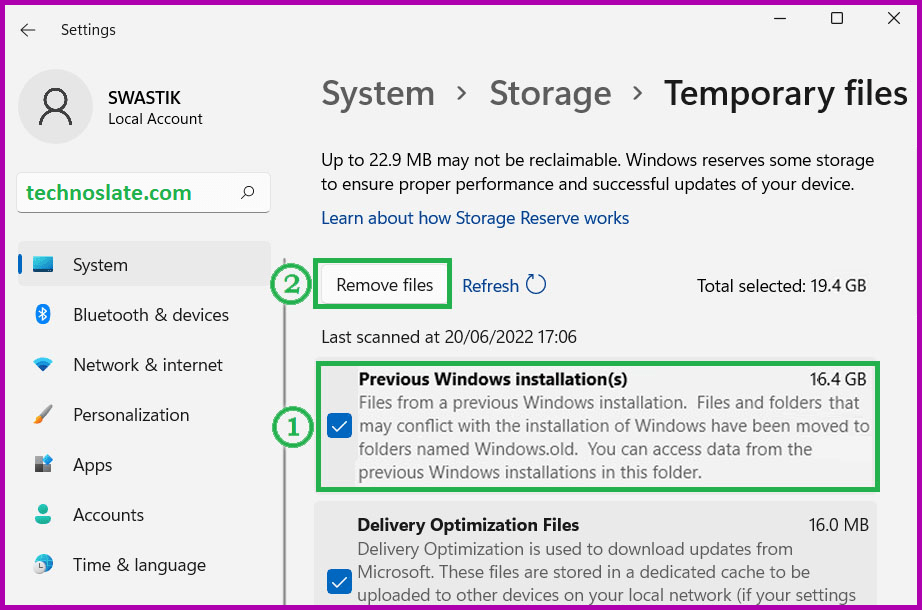
- Click on Temporary Files.
- Check the box of Previous Windows installation(s). and then click on Remove files.
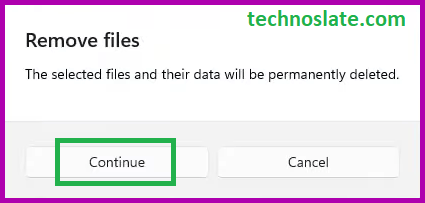
- The system will show you a message asking you to confirm the deletion of the previous Windows installation files. Just click Continue.
Change Power Plan to Improve Windows 11 Performance
If you want the best Windows 11 Performance and don’t want to compromise on battery life, you can change the power plan in Windows 11. This will optimize Windows 11 with the right settings to get the best performance from your computer. We’ve created a dedicated tutorial on how to change the power mode in Windows 11, so you can follow the steps from there. For more information on which Windows 11 settings you should change to improve your experience, check out the linked article.
Use Storage Sense to Make Windows 11 Faster
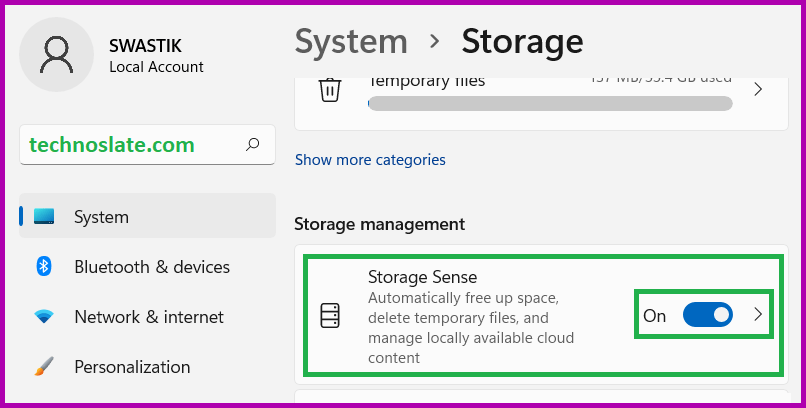
The Storage Sense feature automatically removes junk files and frees up storage space by removing unnecessary items, such as temporary files, items in the Recycle Bin, and files containing older versions of Windows. To make your PC faster and healthier, we recommend that you run Storage Sense once a month. For your information, Storage Sense replaces Disk Cleaner in Windows 10.
- Open Settings and then Storage.
- Under Storage management, Turn ON the button for the Storage Sense.
Role of Core Isolation in Windows 11 Performance
Core isolation provides added protection against malware and other attacks by isolating computer processes from your operating system and device. if you disable core isolation, the system processes will function with less isolation, which could make your system more susceptible to malware attacks. In other words, you make it easier for cyber criminals to access sensitive data on your computer and compromise system processes.
In other words, There are many processes running simultaneously in the Windows 11 operating system. Some of which are normal and some are sensitive system security processes. Core isolation keeps these security processes running in a separate system from the system with the help of vbs and runs them in a virtualized environment by creating a virtual layer. This ensures that if your computer gets infected with malware, these critical processes remain out of the reach of the virus so that they cannot be compromised. This makes core isolation a very important feature for security, which is why it is enabled by default.
Now, you must be wondering why core isolation should be turned off? Because the drop in windows 11 performance is very noticeable, especially for gamer, so it is not needed right now. And there is no need to think much about turning it off because Windows 11 still has other security features like Windows Security and Microsoft Defender Firewall. And it is quite successful in taking care of the security of the system. Let’s move one step further to improve Windows 11 performance.
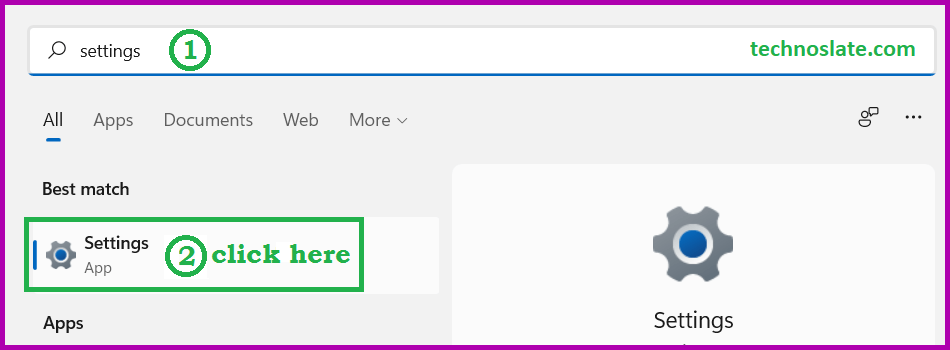
- Open Settings followed by the windows button and search for the Settings.
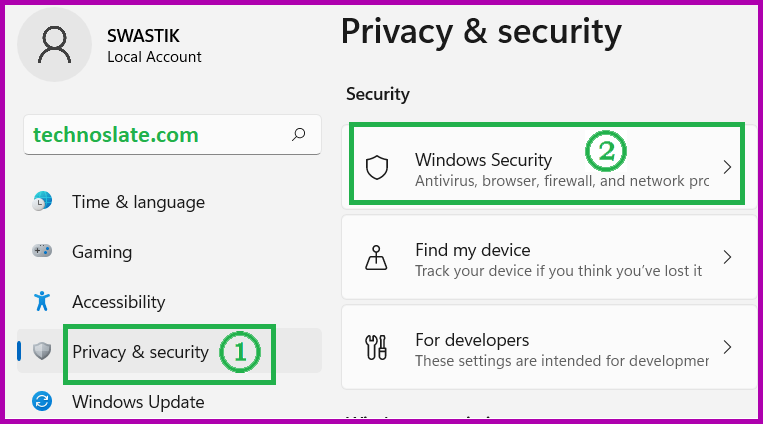
- Click on Privacy & Security and then Windows Security (under the Security label – on right side options).
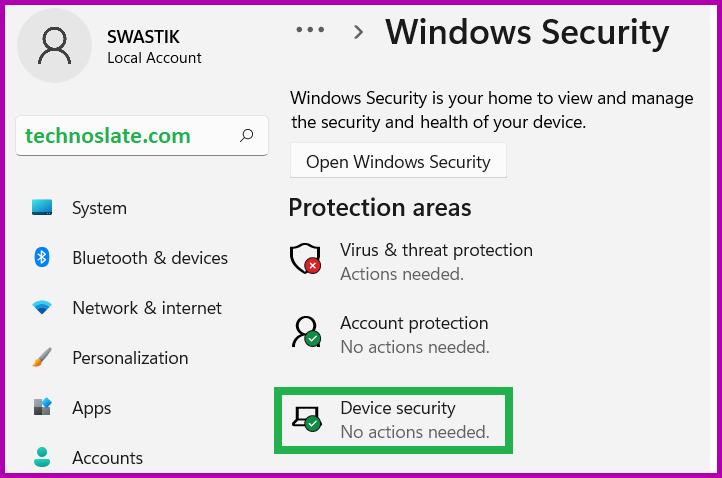
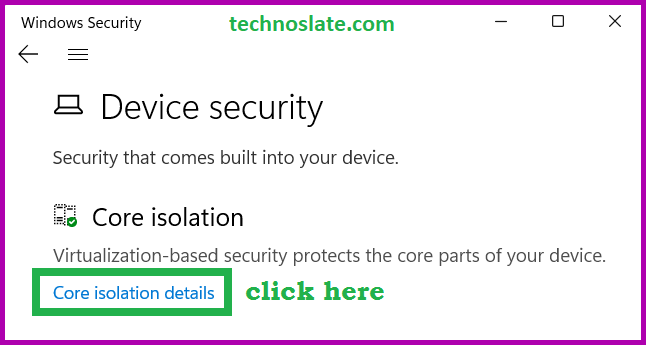
- Look for the Device Security and click on it.
- Click on Core isolation details under the title Core isolation.
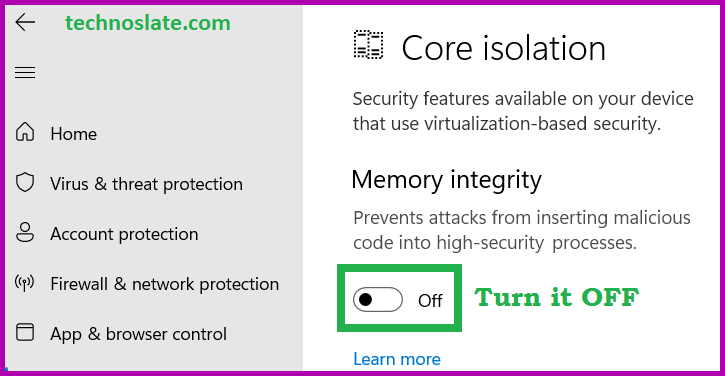
- Turn off the button for Memory integrity.
Restartable Apps
With this feature turned on, the next time you sign back in, the programs or apps that were open when you restarted (or shut down) your computer will automatically launch. Benefit of turning on Restartable Apps is it can prevent you from losing data should your computer shut down or restart unexpectedly. And turning on Restartable Apps lets you pick up where you left off when you restart your computer normally.
Please note that all programs are not restartable, but many are, including most browsers, Microsoft 365 (Microsoft Office) apps, NotePad, File Explorer, Paint, Calculator, Zoom, Skype, Spotify etc. And Restartable Apps are not Startup Programs.
Be careful when choosing which apps to disable, because some of them may be vital to the Windows 11 operating system. As a rule, if you don’t know what one of these apps does, leave it set to its default status until you do. And be careful while trying to increase the of windows 11 performance, we may end up closing the wrong application. However, we can also start it very easily.
To find which apps are registered and enabled as restartable apps, Task Manager will show you the list. Open the Task Manager by pressing Ctrl + Alt + Shift key simultaneously from keyboard. By right-clicking each app under the status column, you can change the restart behavior to match your needs. now, let’s move on to disable the feature restartable apps to improve windows 11 performance.
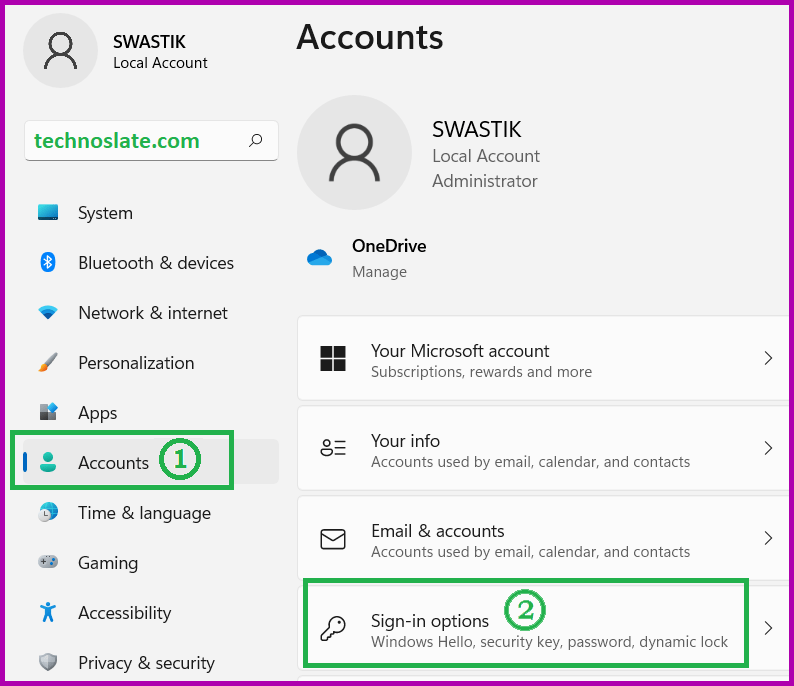
- In Settings application, click on Accounts. Now, click on Sign-in options from the right side options.
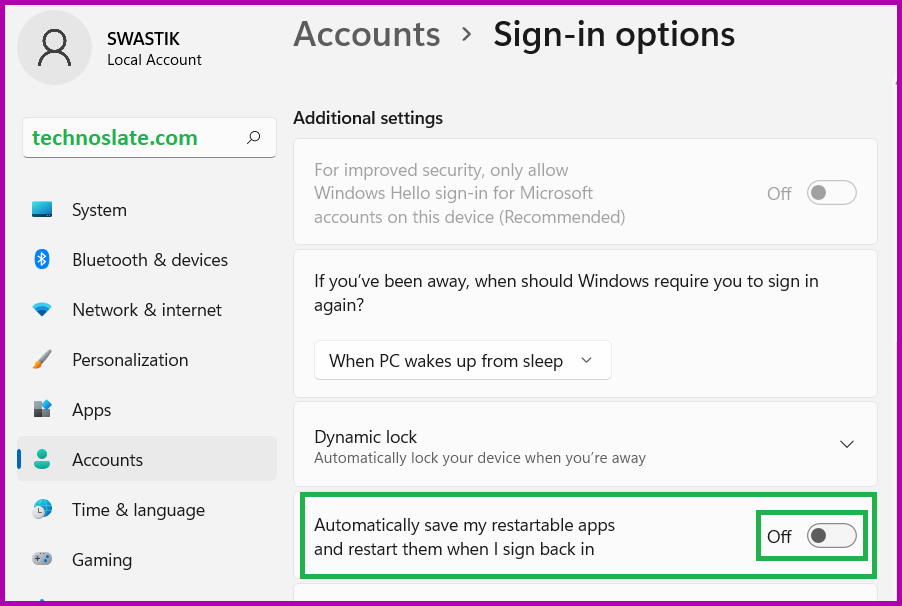
- Turn OFF the button for Automatically save my restartable apps and restart them when I sign back in.
Optimize Virtual Memory
Virtual memory, or paging file, can affect system Windows 11 Performance. To optimize it, go to Settings > System > About > System info > Advanced system settings > Settings under Performance. Here, you can adjust the size of the paging file according to your needs to improve windows 11 Performance.
Consider Hardware Upgrades
If your system is still slow after trying the above tips, consider upgrading your hardware. Adding more RAM, upgrading to an SSD, or even upgrading your CPU can significantly improve Windows 11 Performance.
Other Possible Reasons of Slow Windows 11…
- Physical problems in Hard Disk Drive like physical damage in the head, platters or the spindle.
- Lower Storage Space in the Hard Disk Drive
- Lots of programs running at the same time
- Memory Hungry Program (also known as Resource Intensive Programs) like video editing programs, graphic intensive programs etc
- Outdated Drivers
- Corrupted System Files
- Multiple Anti Virus Software
- Excess storage occupied by Temporary Files
- Much less RAM than system requires
Improving the Windows 11 Performance is a multifaceted process that involves both software optimization and, when necessary, hardware upgrades. By following these tips, you can enhance your system’s speed and efficiency, making your computing experience more enjoyable and productive.
Now, you know very well about how to improve Windows 11 Performance. If this post helped you then please share it with your friends and family to know about it. If you have any questions then feel free to ask in comment section. We will try our best to help you. You can read more such interesting articles here.

you just saved my tons of time.
god bless you bro