Lost an important file on your Windows PC? Maybe you deleted it by mistake… or used Shift + Delete and now it’s completely gone. Now looking for a way to recover permanently deleted files in Windows? That moment of panic is real, especially when the file actually mattered. You’re not alone. It happens more often than you think. But here’s the good news: in many cases, your file isn’t truly gone. With the right steps (and a bit of timing), you can still recover deleted files. In this guide, I’ll walk you through simple, working methods that real users rely on, no confusing jargon, just practical solutions.
Many users assume their data is lost instantly, but in reality, Windows handles deleted files differently than most people expect. In most cases, deleted files aren’t actually erased right away. They remain on your system until they’re overwritten, which means you still have a chance to get them back. In this guide, you’ll learn 5 proven and working methods to recover permanently deleted files in Windows 10/11, step by step. Follow the methods below carefully to maximize your chances of recovery.
Logic Behind Recovering Permanently Deleted Files in Windows
Suppose you accidentally delete a file and wish to retrieve it. Is it possible to get it back? Absolutely Yes. When you delete a file on your computer, it may feel like the file is gone instantly, but that’s not exactly what happens behind the scenes. Your system doesn’t immediately erase the file from the storage.

Let’s understand this in a simple way. Imagine a room filled with many chairs. Some of these chairs are empty, while others are occupied by people. Sitting in one of these chairs is a man named Joseph. In this analogy (comparison), the “room” represents the hard disk, Joseph represents the data, and the “chair” indicates the specific address within the hard disk where the data is stored.
Just imagine that we told Joseph, “Leave your chair and stand anywhere in the room.” He does exactly that, he steps aside and stands right next to his chair, but he leaves his ID card on the chair. Please note that we asked Joseph to get up from the chair, not to leave the room. The chair now looks empty, even though Joseph is still nearby. At this point, someone sitting in the back row might come forward and take that chair, or even a new person entering the room could sit on Joseph’s chair. Since no one else has occupied that chair yet, Jospeh can return and sit back down.
This is similar to what happens in your computer. If you move a file from one place to another, download something new, or copy data from a pen drive or memory card (or from any other source), your system may use that same “empty” spot to save the data where your old data was stored.
Now, someone comes and sits on Joseph’s chair. The moment that happens, Joseph quietly picks up his ID card and leaves the room completely. He’s gone for good and won’t return. And that chair no longer belongs to Joseph.

This illustrates that when you delete data, the system only removes the physical address associated with that data; the data itself remains present on the hard disk. In simple terms, as long as new data does not overwrite the exact location where your deleted file was stored, your deleted data can be recovered.
When you delete a file, your computer does not immediately erase it. This is exactly why tools can recover permanently deleted files in Windows, even after the file disappears from your screen. Your system is designed this way because it’s faster and more efficient. Over time, as you continue to use your computer, saving new files, installing software, or even just browsing the internet, your system starts using that “free” space for new data. When that happens, the old file gets replaced piece by piece. This process is called overwriting, and once it occurs, the original file becomes very difficult or impossible to recover.
This is also the reason why acting quickly is so important after deleting a file. As long as the space hasn’t been reused, recovery tools can still find and restore the data. But once new data takes over, the chances of getting that file back drop significantly.
First Check – Is Your File Still in the Recycle Bin?
Before trying any advanced recovery methods, it’s always a good idea to start with the simplest check. If the file is deleted normally, it might be in the Recycle Bin, especially if you didn’t use Shift + Delete or haven’t emptied recycle bin recently. Many users skip this step and go straight to complex tools, but checking the Recycle Bin can save you time and effort. The file will be restored to its original location instantly.
Steps to Restore Files from Recycle Bin:
- Double click the Recycle Bin icon on your desktop
- Browse or search for your deleted file
- Right click on the file
- Click Restore
When This Method Works:
- You deleted the file normally (without Shift + Delete)
- The Recycle Bin has not been emptied
- The file size was within the Recycle Bin limit
When This Method Won’t Work:
- You used Shift + Delete
- The Recycle Bin was emptied
- The file was deleted from an external device (pen drive, external hard disk, memory card, etc.)
Quick Tip:
If there are hundreds of file in recycle bin, try using the search bar inside the recycle bin, because it is faster than scrolling manually.
Method 1: Recover Deleted Files Using “File History Backup”
If File History was enabled on your system before the file was deleted, recovering it can be surprisingly easy and completely safe. Instead of searching for lost data or scanning your drive, this method simply restores a previously saved copy of your file.
File History is a built in feature in Microsoft Windows that automatically takes backups of your files at regular intervals. It quietly runs in the background and saves copies of files from important folders like Desktop, Documents, Pictures, and Videos. So if a file gets deleted, there’s a chance that an older copy of it is already saved in the backup.
It’s important to understand that File History doesn’t just store “changes” like many people assume. Instead, it creates full copies of files over time. For files like Excel documents, you may see multiple versions because they change frequently. But even for photos or images, which usually don’t change, File History can still keep a backup copy. So if a photo or video is deleted, you can restore it from that saved copy, provided it was backed up earlier.
This method is one of the safest ways to recover deleted files because it doesn’t depend on whether the original data is still present on your drive. As long as a backup exists, recovery is simple and reliable. But if File History was not enabled, or if no backup was created before deletion, then this method won’t work, and you’ll need to use other recovery options.
In simple terms, File History works like a safety net. If it was already in place before the file was deleted, it can save you a lot of trouble. But if it wasn’t set up earlier, it won’t be able to help after the fact.
Steps to Recover Deleted Files Using File History
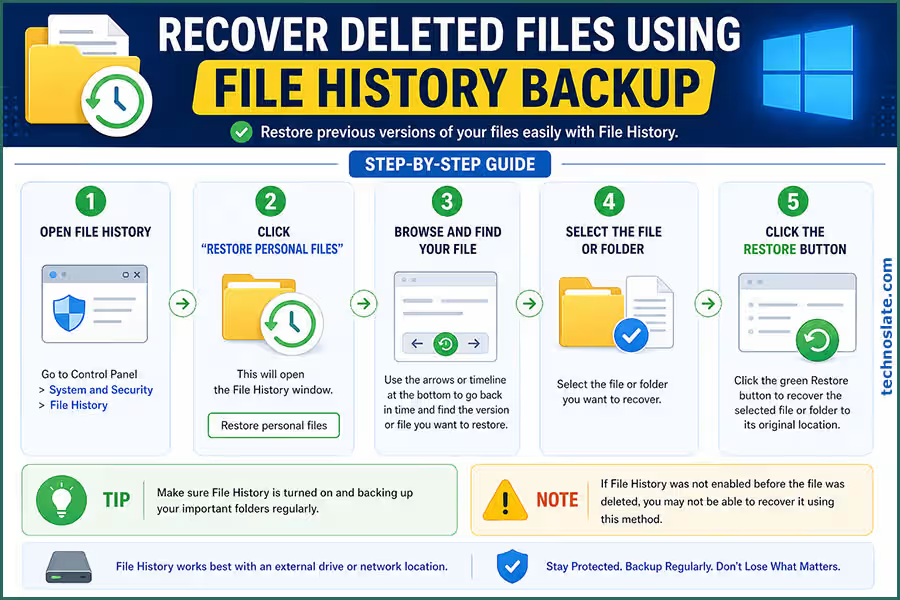
Using this method, once restored, the file will return to its original location. To restore your deleted file, follow these steps:
- Open the folder where your file was originally saved
- Right click inside the folder
- Click on Restore previous versions
- A list of available backup versions will appear
- Select the version that contains your file
- Click Restore to get your file back
Things You Should Know
This method only works if File History was already turned on before the file was deleted. If it wasn’t enabled, then your system wouldn’t have created any backups, and there will be nothing to restore. Also, File History usually saves backups on an external drive or another storage location. So if no backup device was set up earlier, this method may not work.
When This Method Is Useful
This method is especially helpful when you’ve accidentally deleted an important file or when you want to restore an older version of a document that was modified or overwritten. It’s quick, safe, and doesn’t require any technical knowledge. However, this method works only under certain conditions. File History must have been turned on before the file was deleted, and the system must have already created a backup that includes that file. Since File History works on a schedule, not in real time, there’s always a gap between backups. If you downloaded a file and deleted it before the next backup happened, then unfortunately, that file won’t be available for recovery through this method.
When This Method Won’t Work
Another important limitation is that File History only backs up specific folders by default. If your file was stored in Desktop, Documents, Pictures, or similar locations, the chances of recovery are good. But if the file was saved somewhere else, like a custom folder in another drive such as E: or F:, then it won’t be backed up unless you manually added that folder to File History settings. If File History was never enabled on your system, or if no backups were created, then this method won’t be able to help. In such cases, you’ll need to try other recovery options like dedicated recovery software.
Simple Tip
If you haven’t enabled File History yet, it’s a good idea to turn it on now. It works silently in the background and can save you from stressful situations in the future when files get accidentally deleted.
Method 2: Recover Deleted Files Using “Previous Versions”
If you don’t have File History enabled, there’s still another built in option in Microsoft Windows that might help you recover deleted files. This feature is called “Previous Versions,” and it works by restoring older snapshots of your files or folders. These snapshots are automatically created by Windows as part of restore points or system protection. So even if you didn’t manually create a backup, your system might still have saved an earlier version of your file without you realizing it.
How This Method Works
Windows occasionally takes “snapshots” of your system, especially when important changes happen, like installing updates or software. These snapshots include versions of files and folders at that point in time. When you use the Previous Versions feature, you’re basically going back to one of those saved snapshots and restoring your file from there. It’s similar to rolling back to an earlier state where your file still existed. The best part is that this method doesn’t rely on scanning your drive or recovering hidden data. If a previous version exists, you can restore it directly.
How to Recover Deleted Files using “Previous Versions”
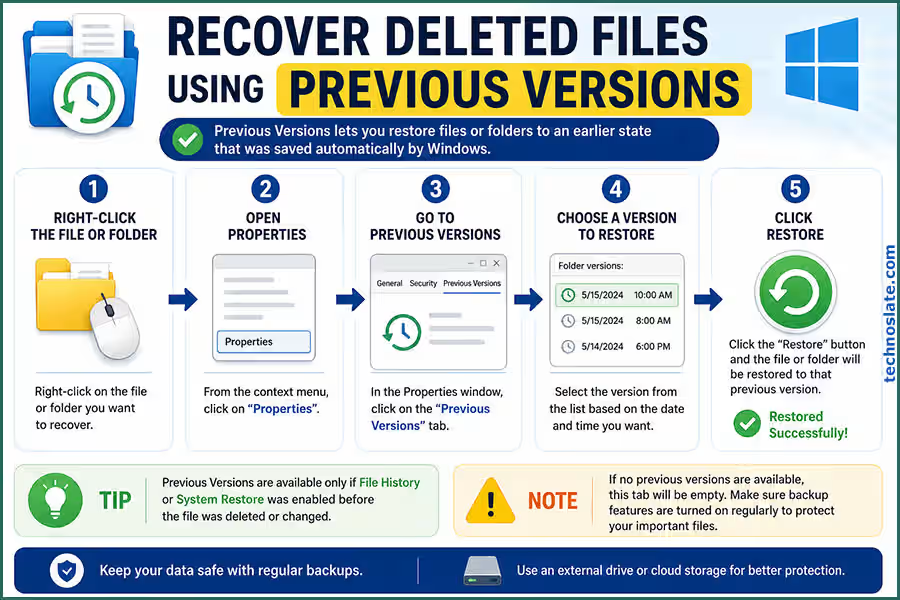
- Go to the folder where your deleted file was originally stored
- Right click inside that folder and select “Restore previous versions”
- You will see a list of available versions saved at different dates and times
- Open each version to check if your deleted file is present
- Once you find the correct version, select it
- Click on “Restore” to recover deleted files
The selected version of the folder will be restored, and your file will appear back in its original location.
Things You Should Know
This method only works if System Protection (restore points) was enabled on your system. If it was turned off, Windows would not have created any snapshots, and no previous versions will be available. Also, the availability of versions depends on how often your system created restore points. Sometimes, you may only see a few options, or none at all.
When This Method Is Useful
This method is helpful when you accidentally delete a file or overwrite an existing one and want to go back to an earlier version. It’s also useful if you didn’t set up File History but still want to try a built in recovery option before using external tools.
When This Method Won’t Work
If no restore points were created or if System Protection was disabled, this method won’t show any previous versions. In that case, you’ll need to move on to more advanced recovery methods like data recovery software.
Simple Tip
Even if you’re not planning to use it right now, it’s a good idea to keep System Protection enabled. It runs in the background and can help you recover deleted files or fix system issues later.
Method 3: Use Data Recovery Software (Most Effective)
If your file is permanently deleted and not available in the Recycle Bin or backups, using data recovery software is your best option. These tools are specifically designed to scan your storage and find files that are no longer visible but still exist in the system. Once found, it allows you to:
- Preview the file
- Restore it to a safe location
How Data Recovery Software Works
When you delete a file, it doesn’t disappear instantly, it just becomes invisible to your system, but the actual data may still remain in the background. Data recovery software scans the drive sector by sector and tries to identify these leftover data blocks. Once it finds them, it reconstructs the file and allows you to recover it. This is why acting quickly is so important, the longer you wait, the harder it becomes to recover deleted files. In simple terms, they try to locate the “traces” of deleted files before they get overwritten by new data. Data recovery software scans your drive deeply and looks for these “hidden” files.
How to Recover Deleted Files Using Software
Save the recovered file to a different location (not the same drive). Follow these steps carefully:
- Choose a Recovery Tool
- Download a reliable data recovery tool. Make sure to download it from the official website. Avoid random or unknown sources.
- Install it on a Different Drive (Important)
- If your file was deleted from the C: drive, install the software on another drive like D: or an external USB. This prevents overwriting your deleted data.
- Select the Drive to Scan
- Open the software and select the drive where the file was originally stored.
- Run a Scan
- Start with a quick scan first. Once the scan is complete, look for your file in the results. If the file is not found, run a deep scan. Deep scan takes more time but gives better results. Most tools allow you to preview files before recovery.
- Preview and Recover Deleted Files
- Look for your file in the results. Preview it (if available). Finally, recover deleted files and save it to a different location, not the same drive.
Important Tips for Better Recovery
- Always recover deleted files to a different drive
- Avoid interrupting the scan process
- Use deep scan if quick scan fails
- Don’t try multiple tools at once on the same drive
When This Method Works Best
- Files deleted recently
- Drive not heavily used after deletion
- No major system damage
Best Free Data Recovery Software (With Pros & Cons)
Choosing the right data recovery software is not just about picking any popular tool, it directly affects whether you’ll actually get your files back or not. Different tools are designed for different situations. Some work well for recently deleted files, while others are better for deep recovery, such as formatted drives or corrupted data. Below are three reliable tools, explained in a practical way so you can decide which one fits your situation.
Recuva  (Best for Simple & Quick Recovery)
Recuva is one of the most beginner friendly data recovery tools available. It is lightweight, easy to install, and designed for users who want a quick solution without dealing with complex settings. In most real world cases, users rely on recovery tools to recover permanently deleted files in Windows when no backup is available. If your file was deleted recently and the drive hasn’t been heavily used, Recuva can recover deleted files within minutes. Actually, Recuva ia the very popular software to recover deleted files in free.
It also includes a simple wizard that guides you step by step, which makes it ideal for non technical users. However, its simplicity is also its limitation. When it comes to deep recovery, such as files deleted long ago or data from formatted drives, its performance is not as strong as more advanced tools. This tool is best suited for quick recovery when files were deleted recently.
Highlights:
- Very simple interface with guided recovery
- Fast scanning for recently deleted files
- Completely free for basic use
Limitations:
- Weak performance in deep scan scenarios
- Not ideal for recovering large or older files
- Interface feels outdated compared to modern tools
EaseUS Data Recovery Wizard  (Best for Deep Recovery)
EaseUS is a more powerful and feature rich recovery tool, often used when basic tools fail. The software performs both quick and deep scans, and its deep scan is particularly effective in finding files that other tools might miss. It also provides a clean interface where you can preview files before recovering them, which helps avoid unnecessary recovery.
EaseUS Data Recovery is designed to handle more serious data loss situations that can recover deleted files even after accidental formatting, corrupted partitions, or files that are no longer easily detectable. That said, the free version comes with limitations, especially in terms of how much data you can recover. For larger recoveries, you may need the paid version. This tool is best suited for important files and situations where basic recovery fails.
Highlights:
- Strong deep scan capability
- High success rate in complex recovery cases
- Supports a wide range of file types and devices
Limitations:
- Free version has recovery limits
- Deep scan can take significant time
- Paid version can be expensive for some users
Disk Drill  (Balanced & User Friendly Option)
Disk Drill is a data recovery software known for its clean and beginner friendly interface. It offers a modern interface along with solid recovery features, making it suitable for both beginners and intermediate users. One of its strengths is how it presents recovery results in a structured and easy to navigate way. It also supports a wide range of file formats and storage devices, which makes it a versatile option.
While it performs well in most scenarios, its free version is limited in terms of recovery size, and deep scans can sometimes be slower compared to other tools. This tool is best suited for users who want a balance between ease of use and recovery power.
Highlights:
- Clean, modern, and easy to use interface
- Good balance between quick and deep recovery
- Supports multiple file types and devices
Limitations:
- Limited recovery in free version
- Slower deep scans in some cases
- Advanced features locked behind paid version
What NOT to Do After Deleting Files
The moment you realize that an important file has been deleted, what you do next becomes critical. Most users either panic or continue using their system normally, without realizing that every small action can affect the chances of recovery. Unfortunately, these actions can do more harm than good. In many cases, files are not permanently lost because of deletion itself, but because of the wrong steps taken afterward. That’s why it’s important to stay calm and avoid certain mistakes while attempting recovery. Your file can still be recovered, but only until that space is reused. Because of this, your immediate priority should be to protect that space from being overwritten.
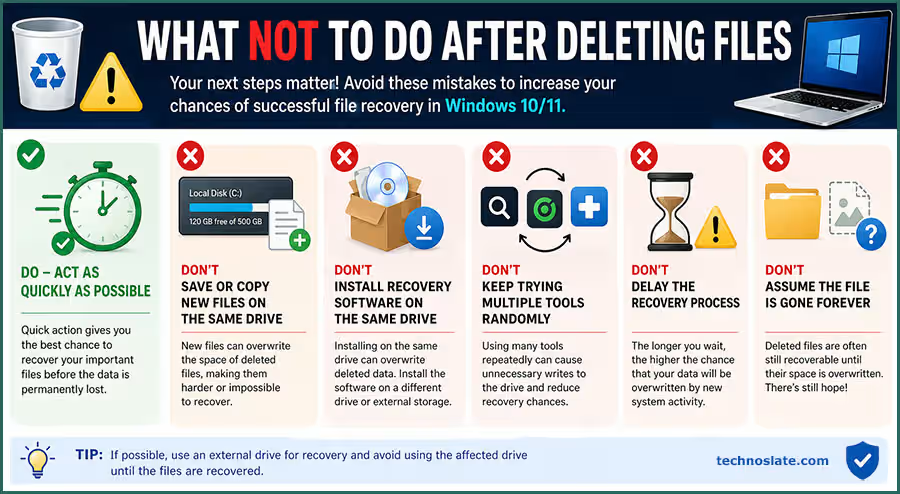
- Don’t Save or Copy New Files on the Same Drive
- Many users unintentionally overwrite their data while trying to recover permanently deleted files in Windows. If you start saving new files, downloading content, or copying data onto the same drive, your system may use that exact space to store new information. This is why it’s strongly recommended to avoid using that drive until you’ve attempted recovery.
- Don’t Install Recovery Software on the Same Drive
- If you want to recover permanently deleted files in Windows successfully, avoiding further activity on the same drive is extremely important. A common mistake people make is installing recovery software on the same drive where the file was deleted. While it may seem convenient, it can actually reduce your chances of recovery. The installation process itself writes new data to the disk, and there’s always a risk that it could overwrite the deleted file’s location. A safer approach is to install the recovery tool on a different partition or use an external USB drive, so the affected drive remains untouched.
- Don’t Keep Trying Multiple Tools Randomly
- Trying multiple recovery tools one after another might feel like increasing your chances, but in reality, it can create unnecessary disk activity. Each scan interacts with the storage and may generate temporary data, which can interfere with the recovery process over time. Instead of jumping between tools, it’s better to choose one reliable software, run a proper scan, and carefully check the results before trying anything else.
- Don’t Delay the Recovery Process
- Time plays a very important role in data recovery. Many users delay the process, thinking they can recover deleted files later, but during that time, the system continues to run background tasks like updates, cache creation, and temporary file storage. These processes can gradually overwrite the space where your deleted file exists. Acting quickly significantly improves your chances of recovering the file successfully.
- Don’t Assume the File is Gone Forever
- Just because a file is no longer visible doesn’t mean it’s permanently lost. Many users give up too early without trying proper recovery methods. In reality, if the data hasn’t been overwritten, there is still a good chance it can be recovered using the right tools and approach. It’s always worth attempting at least one reliable recovery method before assuming the file is gone for good.
- Act as Quickly as Possible
- Time plays a major role in data recovery. The longer you wait, the higher the chances that background processes or regular system usage will overwrite the deleted data. If the file is important, it’s best to start the recovery process as soon as possible. Delaying it for hours or days can significantly reduce the chances of getting the file back. If the deleted file is extremely important, the safest approach is to stop using the system entirely and perform recovery using another device or a bootable recovery tool.
This minimizes all background activity and gives you the best possible chance of success. Recovering deleted files is not only about using the right tools but also about avoiding the wrong actions. A careful and informed approach can make a significant difference in whether your file is recovered or lost permanently.
I hope you enjoyed this post helps you to recover permanently deleted files from Windows. If you found this blog helpful, please share this post with your friends and family. If you have any question in your mind or you are facing any problem then feel free to ask your question in the comment section. We will try our best to help you. You can read more such interesting articles here.